Have you ever wanted to create your very own Transformer toy? Imagine holding a robot in one hand and a cool vehicle in the other, all made by you.
Building a Transformer toy is not just fun—it’s a chance to bring your creativity to life. In this guide, you’ll discover simple steps to turn basic parts into an amazing transforming figure. Ready to start? Keep reading, and by the end, you’ll have the skills to build a Transformer toy that’s uniquely yours.
Materials Needed
Building a transformer toy is a creative and fun project. To ensure success, gather all necessary materials before starting. This helps streamline the process and ensures a smooth assembly. Below are essential materials to have at hand.
Basic Tools
Basic tools are crucial for assembling your transformer toy. These tools help with cutting, shaping, and joining parts together. Here’s what you need:
- Screwdrivers – for tightening screws and bolts.
- Pliers – for gripping and bending wires.
- Utility knife – for precise cutting.
- Glue gun – for securing components.
- Sandpaper – for smoothing edges.
Toy Components
Gathering toy components is essential for building a transformer toy. These components are the building blocks that form the toy’s structure. Key components include:
- Plastic sheets – for creating toy body parts.
- Small screws and nuts – for connecting parts securely.
- Flexible hinges – for movable joints.
- Paint – for customizing the toy’s appearance.
- Decals – for adding detail and personality.
Safety Gear
Safety gear protects you while working on the toy. Using safety gear prevents accidents and ensures a safe environment. Important items to consider:
- Safety goggles – to protect eyes from debris.
- Gloves – to safeguard hands from sharp edges.
- Dust mask – to avoid inhaling dust particles.
- Apron – to protect clothes from spills.

Credit: www.youtube.com
Choosing A Design
Choosing a design is the first step in building a transformer toy. The design affects how your toy will look and work. A clear design plan helps avoid mistakes and saves time. Think about the size, shape, and transformation process. This section guides you through picking the right design for your project.
Simple Vs Complex Models
Simple models are easier to build and transform. They use fewer parts and basic shapes. Great for beginners and quick projects. Complex models have many moving parts and details. They look more realistic and offer challenging builds. Choose simple models for faster results. Choose complex ones for a detailed, impressive toy.
Selecting A Character
Pick a character that inspires you. It can be from cartoons, movies, or your own idea. Characters with clear, bold shapes are easier to design. Think about the character’s vehicle or alternate form. Some characters have many parts to transform. Others have simpler forms. Choose one that fits your skills and tools.
Finding Blueprints
Blueprints show how parts fit and move. They make building easier and more accurate. Search online for free or paid blueprints. Use forums, fan sites, or design software communities. Some blueprints include step-by-step guides. Others only show sketches or diagrams. Pick blueprints that match your chosen design and skill level.
Preparing Parts
Preparing parts is a key phase in building a transformer toy. This step shapes the raw materials into precise components. Proper preparation ensures smooth assembly and a polished final look. It involves cutting, shaping, sanding, and painting the parts carefully. Each task improves the toy’s fit and appearance.
Cutting And Shaping
Start by cutting the parts from their base materials. Use sharp tools like hobby knives or small saws for accuracy. Follow the design outlines closely to avoid mistakes. Shape the edges to match the toy’s form. Small adjustments help parts fit perfectly during assembly. Take your time to avoid damage or uneven cuts.
Sanding And Smoothing
Sand each part to remove rough edges and surfaces. Use fine-grit sandpaper for a smooth finish. Sand in gentle, circular motions to avoid scratches. This step prepares the surface for better paint adhesion. Check for any uneven spots and smooth them thoroughly. Clean off dust with a soft cloth after sanding.
Painting Basics
Choose paint suitable for plastic or metal parts. Apply thin, even coats to prevent drips. Allow each layer to dry fully before adding the next. Use primer first to help paint stick well. Work in a well-ventilated area to avoid fumes. Painting enhances the toy’s look and protects the parts.
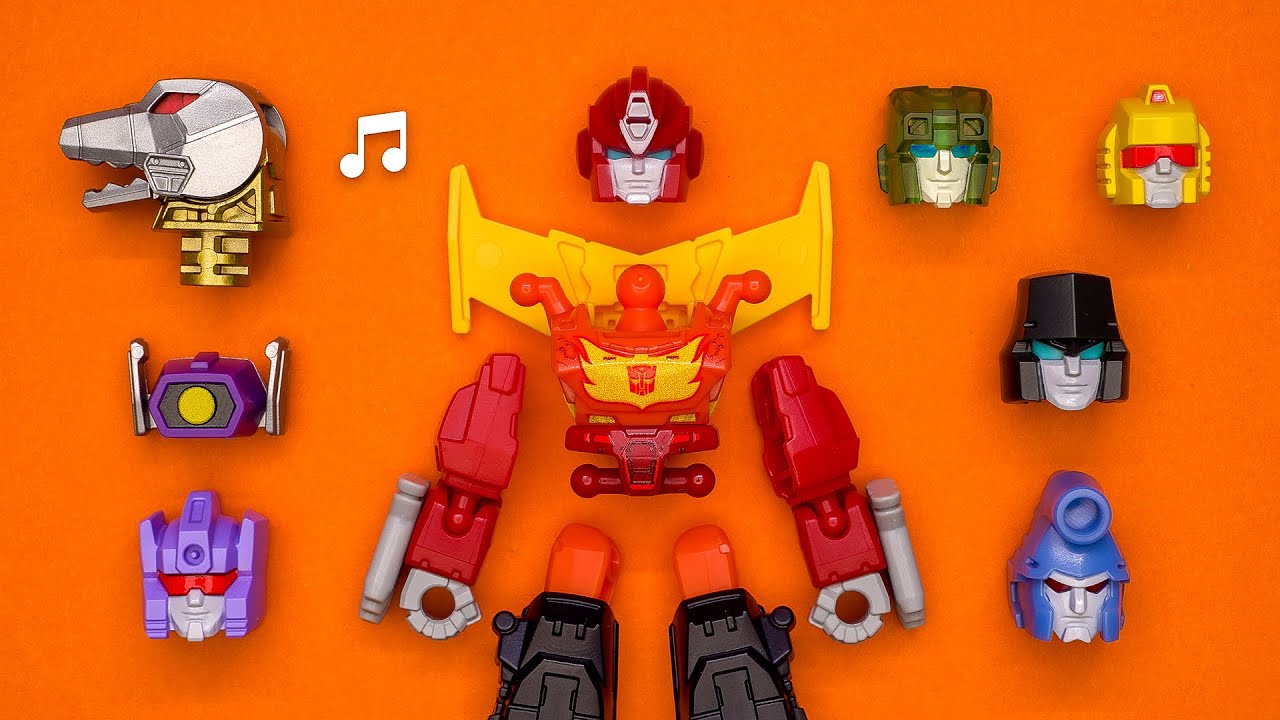
Assembling The Toy
Assembling your Transformer toy is where your creation starts to come alive. This phase requires patience and attention to detail, but it’s also incredibly rewarding. Watch how each piece fits together and brings you one step closer to a fully transformable figure.
Connecting Joints
Begin by identifying the main joints—these are the pivot points where parts will move or rotate. Make sure each joint clicks into place securely but still allows smooth movement. If a joint feels too tight or loose, adjust it gently; too tight can cause breakage, too loose will affect poseability.
Use small tools like tweezers or a flat-head screwdriver to help align pins or pegs into their sockets. This precision can prevent damage and improve the overall function of your toy. Have you noticed how a well-connected joint can completely change your toy’s flexibility?
Securing Parts
Once the joints are set, focus on locking the main body pieces together. Most Transformer toys use clips, tabs, or screws to hold parts firmly. Double-check each connection by giving it a slight tug to ensure nothing slips out during transformation.
Keep spare screws or clips handy in case one falls or gets lost during assembly. Sometimes, a piece might not seem to fit—don’t force it. Instead, review the instruction manual or try adjusting nearby parts; sometimes a tiny shift makes all the difference.
Adding Movable Features
Movable parts like wings, arms, or weapon attachments add personality and playability to your Transformer. Attach these features carefully, making sure they move freely without wobbling. Test each movable part multiple times to see if it locks into position or needs tightening.
Think about how these features impact the toy’s balance and stability. Have you ever struggled to keep your Transformer standing because of a heavy, movable piece? Adjusting the placement or securing it better can solve this problem and improve your display options.
Testing The Transformer
Testing the transformer toy is a crucial step after assembly. It ensures the toy moves smoothly and all parts work as planned. Careful testing helps find weak points and avoid breakage later. Each joint and mechanism must be checked to confirm proper function. This stage brings the toy to life, making sure it transforms easily and stays sturdy.
Checking Movements
Begin by moving each joint slowly. Look for smooth rotation and flexibility. Check arms, legs, and head for free movement. Notice any stiffness or too much looseness. Test the toy in both robot and vehicle forms. Make sure all parts lock securely in place after transforming.
Adjusting Mechanisms
Tighten screws or clips that feel loose. Lubricate joints with a small amount of oil if needed. Bend small metal parts gently to align them. Replace any worn-out or broken pieces. Adjust springs or gears to improve motion. Keep adjustments small to avoid damage.
Troubleshooting Issues
- Parts won’t move smoothly: Clean joints and apply lubricant.
- Mechanisms jam or stick: Check for misaligned pieces.
- Loose parts fall off: Tighten screws and secure clips.
- Toy won’t lock in place: Adjust locking tabs or connectors.
- Unusual noises: Inspect gears for damage or dirt.
Testing and fixing problems early ensures the transformer toy works well. Patience during this step saves time and frustration later.
Credit: www.youtube.com
Customizing Your Toy
Customizing your Transformer toy turns a simple model into a unique creation that reflects your personality and creativity. It’s not just about making it look cool; it’s about making it yours. Adding personal touches can also improve the toy’s functionality and durability, so it lasts through many play sessions or display years.
Adding Details
Small details can make a big difference. You can use fine-tip paint markers to add panel lines, rivets, or battle scars. These tiny touches bring the toy to life and add depth to its appearance.
Try using different colors to highlight joints or mechanical parts. This makes the toy look more realistic and complex. You don’t need to be an artist—simple dots or dashes can create impressive effects.
Using Decals And Stickers
Decals and stickers are a fast way to add logos, symbols, or intricate designs. Look for custom decals online or print your own using decal paper and a regular printer.
Make sure to cut them precisely and apply slowly to avoid air bubbles. After placing, seal them with a clear coat spray to protect the design. Have you ever noticed how decals can instantly upgrade the look of a toy?
Enhancing Durability
Adding customization shouldn’t make your toy fragile. Reinforce weak spots with small amounts of epoxy or super glue, especially around joints and moving parts.
Consider using a matte or gloss clear coat to protect paint and decals from scratches. This layer keeps your hard work safe and ensures the toy stays in great condition even after handling.
Maintaining Your Transformer
Maintaining your Transformer toy is key to keeping it looking sharp and functioning smoothly. These toys often have intricate parts that can wear out or get dirty over time, so regular care helps extend their life and play value. With a little attention, your Transformer can remain a proud centerpiece in your collection or a favorite playmate for years.
Cleaning Tips
Dust and grime can build up quickly, especially in the small joints and crevices of your Transformer. Use a soft brush or a dry microfiber cloth to gently remove surface dust without scratching the paint.
For tougher dirt, lightly dampen a cloth with water or mild soap solution. Avoid soaking the toy, as moisture can damage the joints or decals.
Compressed air is great for blowing out hard-to-reach spots, but be careful not to use it too close or too forcefully to prevent parts from loosening.
Storage Advice
Proper storage prevents damage and keeps your Transformer ready for action. Store your toy in a cool, dry place away from direct sunlight to avoid paint fading and plastic warping.
If you have multiple Transformers, consider using display cases or boxes with soft lining to protect them from scratches.
Try to keep your Transformers in their transformed or neutral position, not forcing parts into extreme poses that might stress the joints over time.
Repairing Common Problems
Loose joints are a common issue that can reduce poseability. Applying a tiny drop of clear nail polish or super glue inside the joint can help tighten it up—but use sparingly to avoid stiffness.
If a small part breaks off, don’t throw it away. Use plastic cement or model glue to carefully reattach it. Holding the piece steady until it sets is crucial for a strong repair.
Have you noticed paint chipping? Touch it up with model paint or markers designed for plastics to keep your Transformer looking fresh without professional help.

Credit: www.youtube.com
Frequently Asked Questions
What Materials Are Needed To Build A Transformer Toy?
You need plastic or metal parts, screws, small tools, and paint. Use sturdy materials for durability and easy transformation.
How Do I Design The Transformation Mechanism?
Plan the moving parts carefully. Use hinges and joints for smooth movement. Test the mechanism multiple times.
Can Beginners Build A Transformer Toy At Home?
Yes, beginners can start with simple designs. Follow tutorials and use easy-to-handle materials. Practice improves skills.
How Long Does It Take To Build A Transformer Toy?
Building time varies from a few hours to days. Complex designs take longer. Set realistic goals and work patiently.
Conclusion
Building a transformer toy takes patience and care. Follow each step slowly and enjoy the process. Use the right tools and parts to avoid mistakes. Try different designs to make your toy unique. Keep practicing to improve your skills. Creating your own transformer toy brings pride and fun.
Now, you have the basics to start building today. Happy building!