In this guide
Have you ever wanted to create something fun that launches objects across the room? Building a toy catapult is a simple and exciting way to do just that.
Imagine the thrill of watching your own creation fling small items with surprising power. In this guide, you’ll learn easy steps to build your very own catapult using everyday materials. Whether you’re looking for a fun project or a hands-on way to understand physics, this is perfect for you.
Ready to turn your ideas into action? Let’s get started!
Materials Needed
Basic craft sticks, rubber bands, a small plastic spoon, and glue make up the simple materials needed. These items are easy to find at home or in stores. Gathering them prepares you to start building a fun toy catapult quickly.
Building a toy catapult is an exciting project that combines fun with learning. Before you embark on this journey, it’s crucial to gather all the necessary materials. Having everything ready will not only make the process smoother but also ensure you don’t face any unexpected hiccups. Let’s dive into what you’ll need to make your catapult a success.Wooden Craft Sticks
Wooden craft sticks are your catapult’s backbone. They provide the structure and stability needed. You can find them easily at craft stores or even repurpose some popsicle sticks. Make sure they’re sturdy enough to withstand the tension during the launch!Rubber Bands
Rubber bands are the power source of your catapult. They create the tension needed to propel your projectile. Choose bands that are strong yet flexible. The right rubber bands can transform your catapult from a mere toy to a powerful launcher.Plastic Spoon
The plastic spoon acts as the launch platform for your projectile. A sturdy spoon will hold your projectile securely until the moment of release. It’s a simple yet effective component that ensures a smooth launch.Glue And Tape
You’ll need glue and tape to hold your catapult together. Glue provides a permanent bond, while tape offers quick fixes and adjustments. Both are essential for maintaining the integrity of your catapult structure.Small Projectiles
What good is a catapult without something to launch? Gather small, safe projectiles like marshmallows or pom-poms. They should be lightweight to ensure a safe and successful launch. You might be surprised at how far these little items can fly!Scissors
Scissors are essential for cutting and trimming materials to the right size. They help you customize your catapult components for the perfect fit. A good pair of scissors can make the building process much easier.Marker Or Pen
A marker or pen will help you mark measurements or make notes during the construction. It’s a handy tool for ensuring precision and keeping track of your progress. Plus, you can personalize your catapult with some creative designs! Now that you’re equipped with this knowledge, what creative twists can you add to your toy catapult?Choosing The Right Design
Choosing the right design is key to building a toy catapult that works well and is fun to use. The design affects how far and how accurately your catapult can launch objects. It also influences how easy the catapult is to build and how safe it is to operate.
Simple designs suit beginners and young builders. They use fewer parts and are quick to assemble. More complex designs offer better performance but require more skill and time.
Understanding Basic Catapult Types
There are several basic catapult types to consider. Each type uses different mechanics to launch objects. Knowing these types helps pick the best design for your needs.
- Lever catapults:Use a long arm to throw objects.
- Torsion catapults:Use twisted ropes or rubber bands for power.
- Sling catapults:Include a pouch to hold the projectile.
- Counterweight catapults:Use a heavy weight to swing the arm.
Choosing Materials And Size
Material choice impacts durability and ease of building. Wood, plastic, and metal are common options. Wood is easy to work with and widely available. Plastic parts are lightweight but may break easily. Metal parts are strong but harder to shape.
The size of your catapult also matters. Small catapults are portable and safe for indoor use. Larger ones launch farther but need more space.
Balancing Power And Safety
Strong tension or heavy weights improve launch distance. But too much power can be dangerous. Choose a design that balances power with safety. Make sure moving parts do not pinch fingers. Use smooth edges and stable bases to prevent accidents.
Step-by-step Assembly
Building a toy catapult is a fun and simple project. Follow these clear steps to create your own launcher. Each part fits together to make a strong and working catapult.
Constructing The Base
Start by choosing a flat piece of wood or sturdy cardboard. This will hold the whole catapult steady. Cut it into a rectangle about 6 inches long and 4 inches wide. Attach two small blocks on each end for extra support. Use glue or small nails to keep the pieces tight. A firm base helps the catapult stay balanced when launching.
Building The Arm
Pick a straight stick or a wooden craft stick for the arm. It should be longer than the base, around 8 inches. Drill or poke a hole near one end of the arm. This hole will help connect the arm to the base. Sand the edges to avoid splinters. The arm will move back and forth to launch the projectile.
Adding The Launching Cup
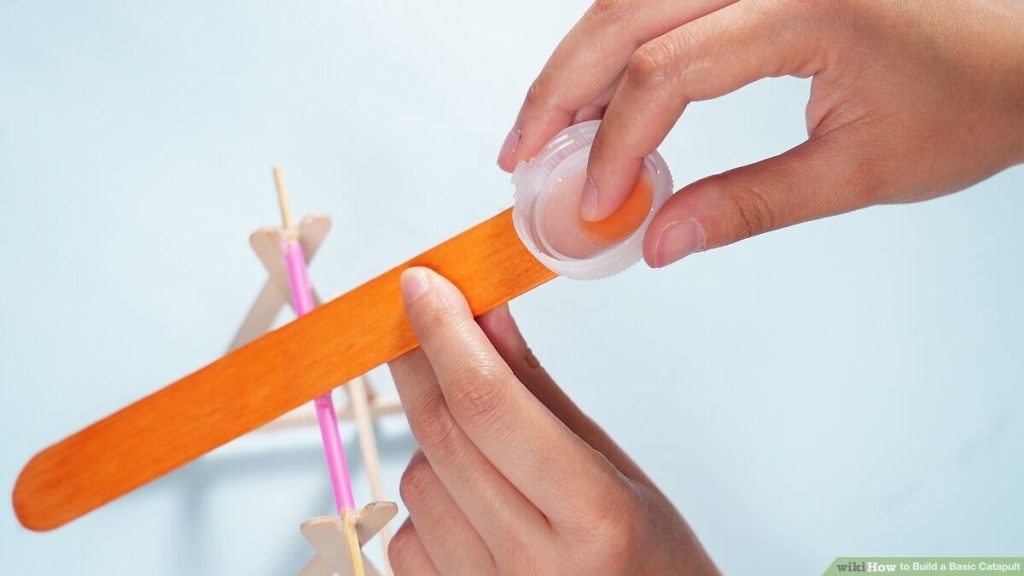
Find a small cup or a bottle cap for holding the projectile. Attach it to the longer end of the arm opposite the hole. Use glue or tape to secure it tightly. Make sure the cup is centered and balanced. The cup holds the item you want to launch and keeps it from falling off.
Attaching The Rubber Bands
Use two strong rubber bands to provide the launching force. Hook one end of the bands to the base near the arm’s hole. Loop the other end around the arm near the cup. The bands should stretch when you pull the arm back. Adjust the tightness for better power. Rubber bands create the tension needed to launch the projectile far.

Credit: www.wikihow.com
Testing And Adjustments
Testing and adjusting your toy catapult is essential to make it work well. This phase helps find any problems and improve the catapult’s performance. Small changes can make a big difference in how far and accurately it throws.
Start by trying a few launches with different objects. Watch how far they fly and note any issues like weak throws or poor aim. Each test gives clues about what to fix or change.
Checking The Launch Distance
Measure how far the toy catapult throws the objects. Use a tape measure or mark the landing spots. This helps see if the catapult reaches the desired range.
Try different weights and sizes of projectiles. Heavier objects might not fly far. Lighter ones may go too far or not land well. Testing various items shows the best fit for your catapult.
Adjusting The Arm Tension
The tension of the throwing arm affects the power of each launch. If the arm is too loose, the object won’t fly far. Too tight, and the catapult may break or not release correctly.
- Tighten or loosen the rubber bands or springs.
- Change the angle of the arm for better energy transfer.
- Ensure the arm moves smoothly without sticking.
Improving Stability And Aim
Check if the base of the catapult stays steady during launches. A shaky base causes inaccurate throws. Add weight or non-slip pads to keep it stable.
Adjust the angle and position of the launch cup or sling. Small shifts can help aim better and make the projectile land where you want.
Safety Tips
Safety should be your top priority when building a toy catapult. Even though it’s a fun project, the materials and mechanisms can cause injuries if handled carelessly. Paying attention to safety tips will make your experience enjoyable and accident-free.
Use Protective Gear
Always wear safety glasses to protect your eyes from unexpected snaps or flying parts. Gloves can help prevent splinters or cuts while handling wooden pieces. You wouldn’t want a small injury to ruin your creative time.
Choose Safe Materials
Opt for soft, lightweight materials like foam balls or cotton balls as projectiles. Hard or sharp objects can cause harm or damage. Have you checked if your materials are child-friendly and non-toxic?
Work In A Clear Space
Set up your catapult-building area away from fragile items or pets. A clutter-free workspace reduces the risk of accidents and lets you focus on your project. Can you imagine how distracting it would be to dodge obstacles while building?
Supervise Young Builders
If children are involved, make sure an adult is present to guide and intervene if necessary. Young hands might not always understand the risks involved. Your careful watch can prevent many mishaps.
Test Carefully
When testing the catapult, aim away from people, pets, and breakables. Start with gentle launches to check the strength and stability of your design. How often do you find yourself surprised by the power of a simple toy?

Credit: www.wikihow.com
Fun Launch Ideas
Launching objects with your toy catapult is the best part of the project. It makes learning about physics exciting and hands-on. You can try many fun ideas to see how far and how accurately you can launch different items.
Each launch teaches you something new about force and distance. Pick items that are safe and light. This keeps the activity fun and injury-free. Experimenting with different objects also helps you understand how weight affects flight.
Launching Mini Marshmallows
Mini marshmallows are soft and light. They fly smoothly and land gently. You can aim at a target or try to hit a cup. This activity is fun for all ages and safe indoors.
Shooting Paper Balls
Crumple a piece of paper into a small ball. These are easy to make and fly well. Try to reach a certain distance or knock over plastic cups. Paper balls are a great way to practice aim and distance control.
Launching Pom-poms
Pom-poms come in many colors and sizes. They are light and bounce softly when they land. Try launching different sizes to see which travels the farthest. Pom-poms add a colorful twist to your catapult fun.
Aiming For Targets
Create simple targets using cups, blocks, or paper circles. Place them at different distances. Challenge yourself to hit the targets with your launched objects. This improves hand-eye coordination and makes the game exciting.
Distance Challenges
Mark a start line and measure how far your object flies. Try to beat your previous distance with each launch. This challenge encourages practice and fine-tuning your catapult for better power and accuracy.

Credit: www.wikihow.com
Frequently Asked Questions
What Materials Do I Need To Build A Toy Catapult?
You need popsicle sticks, rubber bands, a plastic spoon, glue, and small projectiles. These materials are safe, affordable, and easy to find.
How Does A Toy Catapult Work?
A toy catapult stores energy in the rubber bands. When released, it transfers energy to launch the projectile forward.
Can Children Safely Build A Toy Catapult?
Yes, with adult supervision. The materials are non-toxic, and the assembly is simple and safe for kids.
How Far Can A Toy Catapult Launch Objects?
Distance varies by design, but most toy catapults launch objects up to 10-15 feet effectively.
Conclusion
Building a toy catapult is fun and simple. You need just a few materials and steps. This project helps you learn about physics and creativity. Try changing parts to see how it affects the launch. It’s a great way to spend time and learn.
Keep experimenting and enjoy your catapult’s flight!