In this guide
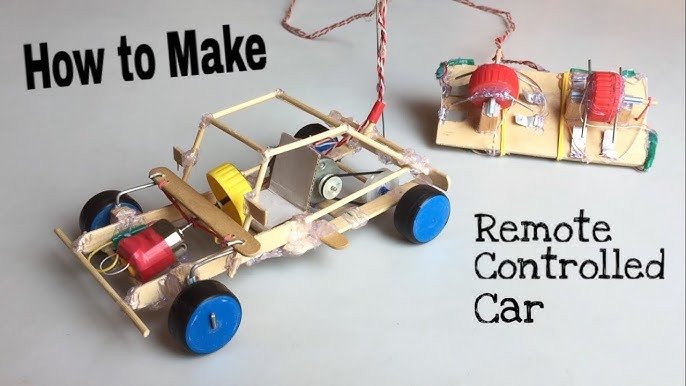
Have you ever wanted to create something exciting with your own hands? Building an electric toy car is a fun and rewarding project that lets you do just that.
Imagine controlling a car you built yourself, watching it zoom across the room. This guide will show you simple steps to bring your toy car to life, even if you’re new to electronics or crafting. Ready to turn your ideas into action and impress your friends?
Keep reading, and let’s get started!
Materials Needed
Gathering the right materials is the first step in building your electric toy car. Having everything ready makes the process smoother and more enjoyable. You’ll need a mix of essential parts and basic tools to bring your project to life.
Essential Parts
- Electric Motor:The heart of your toy car, providing the power to move the wheels.
- Battery Pack:Supplies energy to the motor. Choose rechargeable batteries for longer use.
- Wheels and Axles:These allow your car to roll. You can use wheels from old toys or buy new ones.
- Chassis:This is the frame that holds everything together. Lightweight materials like plastic or thin wood work well.
- Switch:To control the power flow, so you can turn the car on and off easily.
- Wires:For connecting the battery, motor, and switch. Thin insulated wires work best.
- Gears (Optional):If you want to adjust the speed or torque, small gears can help.
Think about what you already have at home before buying parts. Sometimes a broken toy or old electronics can supply many components.
Tools Required
- Screwdriver Set:Essential for assembling parts and securing screws.
- Soldering Iron:Helps to connect wires firmly, but if you’re new to soldering, twist and tape can work temporarily.
- Wire Stripper:Makes it easy to remove insulation from wires without damaging them.
- Hot Glue Gun:Perfect for attaching parts quickly and securely.
- Utility Knife or Scissors:For cutting wires, tape, and trimming materials.
- Multimeter (Optional):Useful for checking electrical connections and battery voltage.
Do you have these tools on hand, or will you need to pick up a few? Having the right tools can save frustration and make your build more precise.
Safety Precautions
Safety is the top priority when building an electric toy car. Taking the right precautions prevents accidents and injuries. Always prepare before starting the project. A safe environment helps focus on the task without distractions or hazards.
Protective Gear
Wear protective gear to guard against potential injuries. Use safety glasses to protect your eyes from dust and sparks. Gloves shield your hands from sharp objects and hot surfaces. Wear closed-toe shoes to protect your feet. Avoid loose clothing that can catch on tools or wires.
Safe Workspace
Choose a clean, well-lit workspace with plenty of room to move. Keep the area free of clutter and flammable materials. Use a sturdy table or bench to support your work. Ensure good ventilation to avoid inhaling fumes from soldering or batteries. Keep a fire extinguisher nearby just in case. Store tools and parts neatly to avoid trips and falls.
Designing The Car
Designing the car is the first creative step in building an electric toy car. It shapes how the car will look and work. Thoughtful design makes the building process smooth and the final toy car fun to use. This stage covers picking a model and sketching the layout.
Choosing A Model
Select a model based on your skill and materials. Simple models suit beginners. Advanced designs offer more features but need more effort. Consider these points:
- Size and shape of the car
- Number of wheels
- Type of motor and battery
- Materials available for building
Choose a model that fits your goals and time. A clear choice helps focus your work.
Sketching The Layout
Draw a rough plan of the car’s parts and how they fit. This step helps avoid mistakes later. Focus on:
- Position of wheels and axles
- Placement of the motor and battery
- Size of the body and frame
- Wiring routes for electrical connections
Keep your sketches simple and clear. Use labels to show parts and connections. This visual guide will help during assembly and testing.
Building The Chassis
Building the chassis is a crucial part of making your electric toy car strong and ready to move. It acts as the main structure that holds every component together. Getting the chassis right means your car will be stable, balanced, and easy to control.
Assembling The Frame
Start by choosing a sturdy base material like lightweight wood, plastic, or metal sheets. Cut the material into the shape and size you want for your toy car’s body. Make sure the frame is wide enough to hold the motor, battery, and wheels comfortably.
Use screws or strong glue to join the pieces of your frame securely. It helps to test the frame’s strength by gently pressing on different parts. Does it feel solid or does it wobble? Fix any weak spots before moving on.
Attaching The Wheels
Pick wheels that fit well with your chassis size and the type of surface your car will run on. Smaller wheels work great on smooth surfaces, while bigger wheels are better for rough terrain. Attach each wheel using axles that connect firmly to the frame.
- Check that wheels spin freely without hitting the frame.
- Ensure all wheels are aligned straight for smooth driving.
- Tighten the axles just enough so wheels don’t wobble but also don’t get stuck.
Have you ever noticed how a slight misalignment in wheels can make a car veer off course? Paying attention here saves you from frustrating test runs later. Take your time, and double-check before moving to the next step.
Installing The Motor
Installing the motor is a crucial part of building your electric toy car. It directly affects how well your car performs and how long it lasts. Getting this step right ensures your toy car runs smoothly and efficiently.
Selecting The Motor
Choosing the right motor depends on the size and weight of your toy car. Small cars usually do well with a simple DC motor, while larger models might need a more powerful brushless motor.
Think about the voltage and speed rating. A motor rated for 6V will work well with two standard AA batteries in series, but if you want your car to go faster, you might need a motor rated for higher voltage.
Check the motor’s torque rating too. Higher torque means better ability to move your car on rough surfaces or inclines. Have you considered what type of terrain your toy car will mostly run on?
Mounting The Motor
Mounting the motor securely is key to avoiding vibrations that can damage your toy car. Use a sturdy bracket or motor mount designed for your motor size to keep it in place.
Make sure the motor shaft aligns perfectly with the car’s wheels or gears. Misalignment causes friction and reduces performance. I once ignored this and ended up with a car that barely moved.
Use screws or strong adhesive to fix the motor mount. Double-check that it doesn’t wobble before connecting the wiring. Remember, a solid mount means better control and longer motor life.

Credit: www.youtube.com
Wiring The Circuit
Wiring the circuit is the heart of building your electric toy car. It’s where all the components come together to make the car move. Understanding how to connect the wires properly can save you a lot of troubleshooting later.
Connecting Wires
Start by identifying the positive and negative terminals on your motor and battery. Use color-coded wires to avoid confusion—red for positive and black for negative usually works well.
Keep your wire connections tight and secure. Loose connections can cause the motor to run weakly or stop working altogether.
Try twisting the wire ends before attaching them to terminals or using solder for a more durable hold. Have you checked if the wires are insulated properly? Exposed wires can short circuit your setup.
- Strip about 1 cm of insulation from each wire end.
- Twist the strands tightly to prevent fraying.
- Attach wires to the motor terminals and battery connectors.
Battery Placement
Where you place the battery affects both the balance and accessibility of your toy car. Place the battery close to the motor to minimize wire length and reduce resistance.
Secure the battery firmly using tape or a small holder to prevent it from moving during play. Movement can disconnect wires and stop the car unexpectedly.
Consider how easy it will be to replace the battery later. Will you need a quick-release holder or is tape enough? Your battery placement should make maintenance simple.
Testing The Car
Testing your electric toy car is where all your hard work meets reality. It’s exciting to see if your design and wiring come together to make the car move smoothly. This phase helps you catch any issues before you finalize your build.
Initial Run
Start by placing your car on a flat surface. Turn on the power and watch how it moves. Does it roll straight, or does it veer off to one side? Pay close attention to the motor’s sound—does it run smoothly or make any unusual noises?
Check if the wheels spin freely without wobbling. If your car struggles to move, try lifting it slightly to see if the wheels turn without resistance. This quick test can reveal problems with alignment or connections.
Troubleshooting Issues
If your car doesn’t run as expected, don’t get discouraged. Begin by checking all wiring connections to ensure none are loose or incorrectly placed. A tiny slip in wiring can stop the motor from running.
Next, inspect the battery. Is it fully charged? Weak power sources often cause slow or no movement. Also, look at the wheels and axles for any obstructions or tight spots.
Ask yourself: Could the motor be overheating? Sometimes running the car without load can help diagnose motor issues. If you notice strange sounds or smells, pause and let the motor cool down before testing again.
Testing your car thoroughly helps you learn more about how each part affects performance. What adjustments will you try next to make your car run even better?

Credit: www.youtube.com
Decorating The Car
Decorating your electric toy car is where creativity meets fun. It transforms a simple build into a unique masterpiece that reflects your personality. You get to choose colors, textures, and small details that make your car stand out on the track or shelf.
Painting Ideas
Choosing the right paint can completely change the look of your toy car. Use acrylic paints for bright colors and quick drying times. Spray paints can give a smooth, professional finish but work in a well-ventilated area.
Try combining colors in patterns like stripes or checkerboards to add visual interest. Metallic or neon paints can make your car pop, especially under sunlight or indoor lights. Don’t forget to apply a clear sealant to protect your paint job from scratches.
Adding Details
Small details bring your toy car to life. Stickers or decals add logos, flames, or racing numbers without much effort. You can also glue on tiny parts like plastic mirrors, spoilers, or headlights for a realistic touch.
Think about texture too—use materials like felt for seats or thin wire for antennas. Adding LED lights can make your car shine at night, which is always a crowd-pleaser. What unique detail will you add that no one else might think of?
Tips For Improvements
Improving your electric toy car can make it more fun and efficient. Small tweaks can boost performance and give your car a unique look. Let’s look at some practical tips to enhance your build and make it truly yours.
Enhancing Speed
Speed is often the first thing you want to improve. Start by checking the motor specifications—upgrading to a motor with higher RPM can give your car a noticeable boost.
Don’t forget the power source. Using a battery with a higher voltage can increase speed, but be careful not to exceed the motor’s limits to avoid damage.
Reducing weight is another simple way to go faster. Replace heavy parts with lighter materials like plastic or aluminum, and remove unnecessary components.
- Use high-quality, low-resistance wiring to ensure efficient power flow.
- Adjust the gear ratio to find the right balance between acceleration and top speed.
- Keep the wheels aligned and use smooth tires for less friction.
Have you tried changing the gear setup on your toy car? It can dramatically affect how it accelerates and handles.
Customizing Design
Your toy car should reflect your style. Customizing the design is a fun way to make it stand out and express creativity.
Start with the body shell. You can paint it with bright colors or add decals to give it a personal touch.
Experiment with different materials for the body, such as lightweight foam or plastic, to improve both appearance and speed.
- Try adding LED lights for a cool, realistic effect.
- Use 3D-printed parts for unique shapes that are hard to find in stores.
- Consider adding a small spoiler or fins to improve aerodynamics and style.
What design features would make your toy car look like a mini version of your dream vehicle?

Credit: www.tiktok.com
Frequently Asked Questions
What Materials Are Needed To Build An Electric Toy Car?
You need a small electric motor, battery pack, wheels, chassis, wires, and a switch. These basic materials help create a functional electric toy car.
How Do You Connect The Electric Motor To The Battery?
Connect the motor’s positive terminal to the battery’s positive terminal using wires. Then, connect the negative terminals similarly to complete the circuit.
What Type Of Battery Is Best For Toy Cars?
AA or AAA rechargeable batteries work well. They provide enough power and are safe and easy to replace in electric toy cars.
How Can I Improve The Speed Of My Electric Toy Car?
Use a more powerful motor, reduce the car’s weight, or increase the battery voltage. These changes help enhance the toy car’s speed effectively.
Conclusion
Building an electric toy car can be fun and rewarding. You get to learn about motors, batteries, and simple circuits. Step-by-step, you create something that moves on its own. The process teaches patience and problem-solving skills. Plus, you enjoy a cool toy made by your hands.
Keep experimenting and improving your design. This project helps you understand how things work. Try different parts and see what changes. Enjoy the ride, and keep building!