Looking for a fun and creative way to brighten your day? A Button Bag Craft Kit is just what you need.
Imagine turning simple buttons into a colorful, unique bag that you made yourself. It’s easy, relaxing, and perfect for anyone who loves hands-on projects. Whether you’re new to crafting or looking for a fresh idea, this kit gives you everything you need.
Keep reading to discover how this simple craft can spark your creativity and bring a smile every time you use your new bag.

Credit: www.clothkits.co.uk
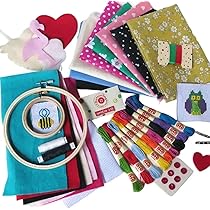
Materials Needed
Gathering the right materials sets the foundation for a successful button bag craft project. Each item you choose affects the look and durability of your finished bag. Let’s break down the essentials you’ll need before you start stitching.
Fabric Selection
Pick a fabric that feels sturdy enough to hold shape but is easy to sew. Cotton canvas, denim, or linen are popular choices because they balance durability and style. Think about the bag’s purpose—will it carry heavy items or just light essentials?
Consider patterns and colors that reflect your personality or match your wardrobe. Have you ever noticed how a bold print can transform a simple bag into a statement piece? That’s the power of fabric choice.
Button Choices
Buttons aren’t just functional; they’re the highlight of your bag’s design. Choose a variety of sizes and colors to add texture and interest. Wooden buttons offer a rustic feel, while shiny plastic or metal buttons can create a modern look.
Do you want all buttons to match perfectly, or do you prefer an eclectic mix? Your decision here sets the tone for the craft’s style. Remember, quality buttons last longer and hold better, so don’t skip on this.
Thread And Needles
Select thread that complements your fabric and buttons. Polyester thread is strong and versatile, suitable for most fabrics. If your fabric is thick, use heavy-duty needles designed for tougher materials.
Using the right needle size prevents fabric damage and makes sewing smoother. Have you noticed how a dull needle can slow you down and create uneven stitches? Investing in good needles makes your crafting experience enjoyable.

Credit: www.clothkits.co.uk
Design Inspiration
Design inspiration is the spark that turns a simple button bag craft kit into a unique work of art. It guides your choices, from colors to patterns, helping you create a bag that reflects your personal style. Thinking about design before you start can make the crafting process more fun and rewarding.
Color Combinations
Choosing the right colors can completely change the look of your button bag. Try pairing contrasting colors like navy blue and bright orange for a bold statement. Or go for soft pastels such as mint green and peach for a gentle, calming effect.
Consider the mood you want your bag to express. Are you aiming for something vibrant and energetic or subtle and elegant? Don’t hesitate to experiment with unexpected color mixes—you might discover a new favorite palette.
Pattern Ideas
Patterns bring life to your bag and can make it stand out. You could arrange buttons in geometric shapes like triangles or circles, creating a modern and clean look. Alternatively, try scattered clusters of buttons to give a playful, organic feel.
Think about repeating simple shapes or mixing several patterns for a layered effect. Have you tried combining stripes with polka dots using buttons? It’s a fun way to test your creativity and add texture to your design.
Step-by-step Instructions
Creating your button bag is fun and simple with clear steps. Follow the instructions carefully to get the best results. Each phase builds on the last. Patience and care bring a beautiful handmade bag.
Preparing The Fabric
Start by choosing the fabric provided in the kit. Iron the fabric to remove any wrinkles. Lay it flat on a clean surface. Use the pattern pieces to cut the fabric shapes. Cut slowly to keep edges neat. Mark any sewing lines with a fabric pencil.
Sewing Techniques
Thread the needle using the kit’s thread. Tie a knot at the end for security. Use simple running stitches to join fabric pieces. Keep stitches small and even for strength. Turn the bag inside out once sewn. Press seams flat with your fingers or an iron.
Attaching Buttons
Select buttons from the kit that match your design. Thread the needle again and knot the end. Sew each button firmly onto the fabric. Pass the needle through the buttonholes multiple times. Secure the thread with a knot at the back. Arrange buttons to add style and function.
Personalization Tips
Personalizing your Button Bag Craft Kit turns a simple project into something truly yours. It’s a chance to express your style and creativity. Small changes can make a big impact and help your bag stand out.
Adding Embellishments
Adding embellishments is a fun way to give your button bag a unique touch. You can sew on beads, patches, or even tiny charms to the fabric. Think about mixing textures—maybe a bit of lace or ribbon alongside the buttons to add depth.
Try using buttons of different sizes and colors to create patterns or shapes. Have you ever thought about spelling out your initials or a short word with buttons? It’s a personal detail that makes the bag feel special.
Customizing Size And Shape
Don’t feel limited by the original size or shape of the bag in the kit. You can adjust the dimensions to suit your needs—whether you want a small pouch or a larger tote. Changing the shape can also add a fresh look; try a square, round, or even an asymmetrical design.
If you resize the bag, keep in mind how the buttons will fit. You might want to add more buttons or space them differently to keep the balance. What size would make this bag most useful for you every day?
Care And Maintenance
Proper care and maintenance keep your button bag craft kit in good shape. Clean and repair your bag regularly. This helps it last longer and look nice.
Cleaning Methods
Use a soft brush to remove dust and dirt gently. Spot clean stains with a damp cloth and mild soap. Avoid soaking the bag to protect the buttons and fabric. Let the bag air dry completely before use. Do not use harsh chemicals or bleach.
Repair Tips
Check buttons for loose threads often. Use a needle and matching thread to sew buttons back firmly. Replace missing buttons with similar ones from the kit. Fix small tears with fabric glue or patches. Handle repairs quickly to avoid bigger damage.
Showcasing Your Creation
Showcasing your creation from the Button Bag Craft Kit is a rewarding way to celebrate your effort. Sharing your finished bag highlights your creativity and inspires others. Presenting your work nicely also helps you feel proud and confident.
Photography Tips
Good photos make your bag look its best. Use natural light near a window for clear and bright images. Avoid harsh shadows by shooting during the day.
Choose a simple background to keep the focus on your bag. A plain wall or wooden surface works well. Take pictures from different angles to show details and the full design.
- Hold the bag up or place it flat
- Capture close-ups of buttons and stitching
- Use a tripod or steady surface to avoid blur
Sharing On Social Media
Posting your creation on social media connects you with others who love crafts. Write a short story about making your bag. Mention the fun or challenges you had.
Use clear photos and tag craft groups or friends who enjoy similar projects. Respond to comments to build a friendly community. Your shared work can motivate others to try the kit too.

Credit: www.clothkits.co.uk
Frequently Asked Questions
What Is Included In A Button Bag Craft Kit?
A button bag craft kit typically includes fabric, buttons, thread, needles, and step-by-step instructions. These kits provide all materials needed to create a stylish, personalized bag easily.
How Long Does It Take To Complete The Craft Kit?
Most button bag craft kits take between 1 to 3 hours to complete. The time varies depending on skill level and design complexity.
Is The Button Bag Craft Kit Suitable For Beginners?
Yes, most kits are designed for beginners with clear instructions. They help users learn sewing basics while creating a functional bag.
Can Kids Use The Button Bag Craft Kit Safely?
Yes, with adult supervision, kids can safely use these kits. The materials are generally child-friendly, promoting creativity and fine motor skills.
Conclusion
Creating with a button bag craft kit brings joy and creativity. It helps you make something useful and pretty. Each step is simple and fun to follow. You can share your finished bag with friends or family. Crafting also improves focus and hand skills.
It’s a great way to spend free time. Try it once, and you might want to create again. A button bag craft kit is a nice choice for all ages. Give it a go, and enjoy the process!


