In this guide
Are you ready to create something special that your child will love? Building a toy kitchen is a fun and rewarding project that brings imagination to life right at home.
Imagine the joy on your child’s face as they explore their very own cooking space, designed and built by you. In this guide, you’ll discover simple steps and clever tips to make a toy kitchen that’s safe, sturdy, and full of charm.
Let’s get started and turn your ideas into a playful masterpiece your family will treasure!
Materials And Tools Needed
Building a toy kitchen is a fun project that sparks creativity. To start, gather the right materials and tools. This ensures your project is safe and sturdy. Let’s look at what you’ll need.
Choosing The Right Wood
Wood is the main material for your toy kitchen. Choose durable wood like pine or plywood. Pine is lightweight and easy to work with. Plywood offers strength and stability. Ensure the wood is smooth. This prevents splinters and injuries.
Essential Tools For The Project
Having the right tools makes the job easier. You’ll need a saw to cut the wood. A drill is necessary for assembling parts. Use a measuring tape for accuracy. Sandpaper smooths rough edges. Have a screwdriver handy for screws.
Optional Decorative Items
Decorative items add charm to your toy kitchen. Paint gives a colorful look. Stickers can make it fun and lively. Small knobs mimic real kitchen handles. Fabric pieces work well for curtains or tablecloths.

Credit: www.diythought.com
Designing Your Toy Kitchen
Designing your toy kitchen is an exciting part of the project. This stage sets the foundation for how functional and fun the final product will be. You want a design that fits your space, suits your child’s play style, and sparks creativity.
Planning The Layout
Think about where your toy kitchen will live. Will it be against a wall or in the middle of the room? Planning the layout helps you decide how much space you have to work with and how accessible the kitchen will be for your child.
Consider the flow of play. Kids often move between “cooking,” “washing,” and “storing” areas. Arranging these zones logically makes play more enjoyable and realistic. Have you noticed how kids use their kitchens at home? Mimicking that can guide your layout choices.
Measuring And Sketching
Grab a tape measure and start by measuring the space where your toy kitchen will go. Accurate measurements prevent surprises later. Then, sketch a rough plan on paper or use simple drawing apps.
Don’t worry about perfect drawings. The goal is to visualize the size and placement of cabinets, counters, and appliances. This step helps catch mistakes early and gives you a clear roadmap before building.
Selecting Functional Features
Decide which features your toy kitchen will have. Will it include a sink with a faucet, a stove with knobs, or a mini fridge? Functional elements make play more interactive and exciting.
Think about adding storage shelves, hooks for utensils, or a chalkboard for menus. These small details encourage imaginative play and keep everything organized. What features does your child enjoy most in their real kitchen? Adding those can make the toy version feel special.
Cutting And Preparing The Pieces
Cutting and preparing the pieces is a key part of building a toy kitchen. Precise cuts ensure the kitchen fits together well and looks great. Take time to measure and mark each piece carefully. This step sets the foundation for a sturdy, safe toy kitchen.
Safety Tips For Cutting Wood
- Wear safety goggles to protect your eyes.
- Use ear protection if cutting loud materials.
- Keep fingers clear of the saw blade at all times.
- Work on a stable surface to avoid slips.
- Wear a dust mask to avoid inhaling sawdust.
- Ensure tools are sharp and in good condition.
Cutting Panels And Components
Start by cutting the large panels for the kitchen base and sides. Use a measuring tape and pencil to mark lines clearly. Follow your marks slowly with a saw to keep cuts straight. Cut smaller parts like shelves and doors next. Check each cut piece against your plan before moving on.
Sanding And Smoothing Edges
Sand all cut edges to remove splinters and rough spots. Use medium-grit sandpaper first, then fine-grit for a smooth finish. Pay special attention to corners and edges children will touch. Smooth surfaces help prevent injuries and give a polished look. Wipe away dust before assembly to ensure clean joints.
Assembling The Kitchen Structure
Assembling the kitchen structure is where your toy kitchen starts to take shape. This part requires precision and patience, but seeing the panels come together will motivate you to keep going. The main goal is to create a sturdy frame that can handle playtime without wobbling or falling apart.
Joining Panels Securely
Begin by lining up the main panels—the sides, back, and base. Use screws or strong wood glue depending on your materials. If you use screws, pre-drill holes to avoid splitting the wood.
Clamps can be your best friend here; they hold panels in place while the glue dries or while you screw pieces together. Don’t rush—double-check that everything is square and flush. A slight misalignment now can cause bigger problems later.
Adding Shelves And Compartments
Shelves add both function and charm to your toy kitchen. Decide how many you want and at what heights. Adjustable shelves are a smart choice if you want flexibility for different toy sizes.
Use small brackets or wooden cleats to support each shelf securely. Consider adding compartments or cubbies to organize play food or utensils. These little details make the kitchen more engaging and realistic for kids.
Installing Doors And Drawers
Doors and drawers bring your kitchen to life, but installing them can be tricky. Start by attaching hinges to the doors, then carefully align them with the kitchen frame. Use a level to make sure doors hang straight and open smoothly.
For drawers, simple wooden slides or small metal runners work well. Test each drawer multiple times to ensure it glides effortlessly. If you notice any sticking, a little sanding or lubrication can fix it quickly.
Have you thought about adding magnets or child-safe latches to keep doors and drawers closed during play? Small touches like these improve durability and safety.
Painting And Finishing Touches
Painting and finishing touches transform your toy kitchen from a simple wooden frame into a vibrant play space that sparks imagination. These final steps are crucial not only for aesthetics but also for safety and durability. Paying attention to details during painting ensures your child’s new kitchen will stand up to enthusiastic play and look great doing it.
Choosing Child-safe Paints
Start by selecting paints labeled as non-toxic and safe for children. Look for water-based acrylic paints that have low or zero volatile organic compounds (VOCs). These paints dry quickly and produce minimal fumes, which is important when working on a project for kids.
Have you ever thought about how paint fumes might affect your child’s health? Choosing the right paint protects both the environment and your little chef. Avoid spray paints and anything with strong chemical smells to keep your workspace safe and comfortable.
Applying Primer And Paint
Primer creates a smooth base for your paint and helps it stick better to the wood, increasing durability. Apply a thin, even coat of primer and let it dry completely before painting. This step prevents the paint from peeling or chipping during playtime.
Use a small brush or foam roller to apply paint in thin layers. Multiple thin coats give a richer color and a smoother finish than one thick coat. Allow each layer to dry fully before adding the next to avoid sticky or uneven surfaces.
Adding Decorative Details
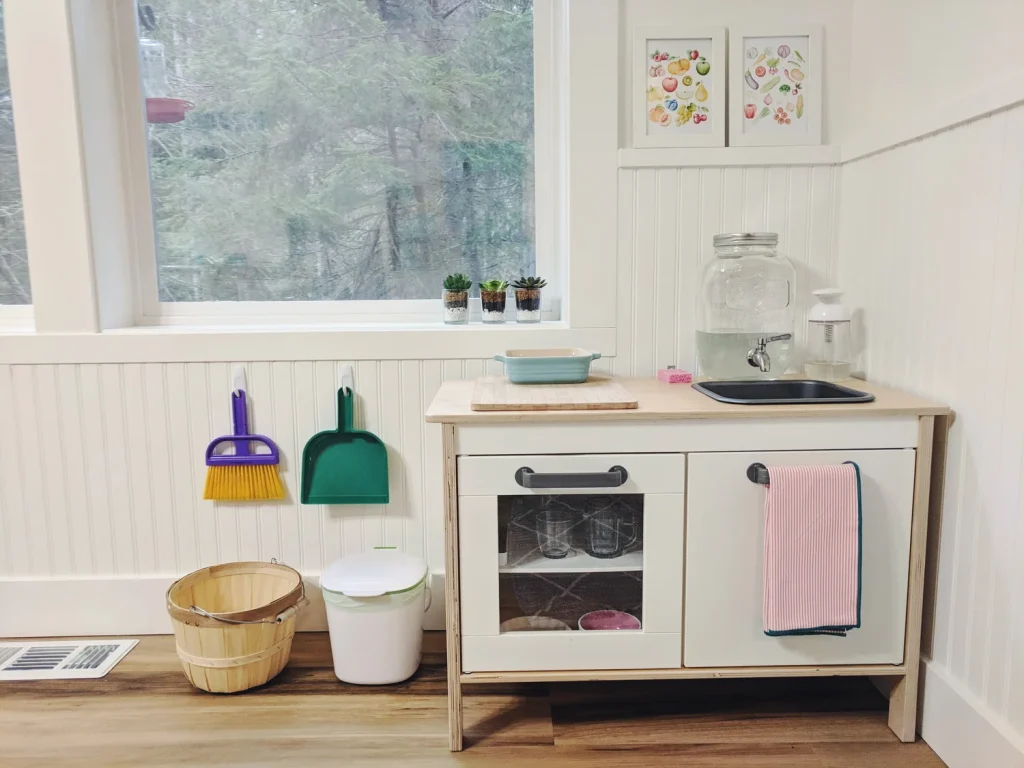
Details like knobs, painted buttons, or chalkboard panels make your toy kitchen feel real and personalized. Consider adding stickers or stencils of fruits, utensils, or cute kitchen phrases to bring extra fun to the design.
Think about what your child loves most—do they enjoy baking or cooking? Customize your details accordingly to make the toy kitchen more engaging. Adding a clear, child-safe sealant will protect these decorations and keep your kitchen looking fresh through many play sessions.

Credit: www.montessoriinreallife.com
Adding Accessories And Fixtures
Adding accessories and fixtures brings your toy kitchen to life. These small details make the play experience more realistic and exciting. They also offer chances for creativity and personalization, so your child feels truly connected to their kitchen space.
Attaching Knobs And Handles
Knobs and handles are easy ways to make the kitchen look authentic. Use small wooden beads, buttons, or leftover cabinet knobs from hardware stores. Screw or glue them securely to doors and drawers so they can be opened and closed during play.
Think about using different shapes and sizes to make each drawer or cabinet unique. This also helps kids learn to identify objects by touch. Have you tried swapping knobs for different seasons or themes? It’s a simple way to refresh the kitchen’s look.
Creating Faux Appliances
Faux appliances add excitement without the cost of real electronics. Paint cardboard boxes to look like ovens, microwaves, or refrigerators. Add details like buttons with stickers or drawn-on dials to boost realism.
Magnetic strips can hold “control panels” that kids can move around. A small battery-operated light inside a cardboard oven adds a surprising touch. What appliance would your child want most? Building it yourself lets you customize features exactly to their liking.
Incorporating Play Utensils
Utensils turn your toy kitchen from a prop into a full experience. Include items like wooden spoons, plastic pots, and cups. Many can be found cheaply at thrift stores or dollar shops.
- Use a small basket or drawer to keep utensils organized.
- Label containers to encourage early reading skills.
- Mix real and pretend items to spark imaginative play.
Have you noticed how having real tools sparks a child’s creativity? They can pretend to stir, pour, and serve just like grown-ups. This simple addition transforms cooking play into a fun, hands-on adventure.
Safety Checks And Maintenance
Building a toy kitchen is exciting, but keeping it safe and well-maintained is just as important. Your child’s play area should be a secure space where creativity flows without worry. Regular safety checks and upkeep help you catch problems early and extend the life of the kitchen.
Ensuring Stability And Safety
Start by making sure your toy kitchen sits firmly on the floor. Check that all parts are tightly attached, especially doors, knobs, and shelves. Loose pieces can cause accidents, so tighten screws and bolts regularly.
Look for sharp edges or splinters that could hurt little hands. Sand down rough spots and cover corners with soft tape if needed. Ask yourself: Could your child bump into or trip over any part? Fixing these risks keeps playtime safe and worry-free.
Regular Cleaning Tips
Clean your toy kitchen often to avoid germs and sticky messes. Use a mild soap and warm water to wipe down surfaces, then dry them thoroughly. Avoid harsh chemicals that might damage paint or materials.
Don’t forget to clean inside drawers and cupboards where crumbs and dust can gather. A damp cloth or gentle vacuum works well here. Keeping the kitchen clean also makes it more inviting for your child to enjoy.
Repairing Wear And Tear
Look for signs of wear like chipped paint, cracked plastic, or loose hinges. Small repairs prevent bigger problems later on. Use non-toxic glue or replace parts as soon as you notice damage.
Sometimes, a simple touch-up with paint or tightening a screw can make a huge difference. Have spare parts handy or buy replacements online to keep the kitchen functional. How often do you inspect your child’s toys for damage? Making it a habit protects both your child and your investment.
Creative Variations And Upgrades
Creative variations and upgrades make a toy kitchen more fun and unique. They help tailor the play space to suit a child’s interests and boost imagination. Small changes can bring a fresh look and new ways to play. Explore different ideas to customize and enhance your toy kitchen.
Customizing Colors And Themes
Choose colors that match your child’s favorite shades. Bright reds, soft pastels, or bold blues can change the kitchen’s mood. Use paint, stickers, or wallpaper to add patterns or characters. Themes like farmhouse, modern, or vintage create a special feel. Personal touches make the kitchen feel like a real place.
Adding Interactive Elements
Interactive parts make play time more exciting. Attach knobs that click or turn for realistic control. Install small lights to mimic stove burners or fridge lights. Use chalkboard paint on a section for menus or notes. Add hooks and baskets for easy storage and organization. These elements invite hands-on play and keep kids engaged longer.
Expanding The Kitchen Setup
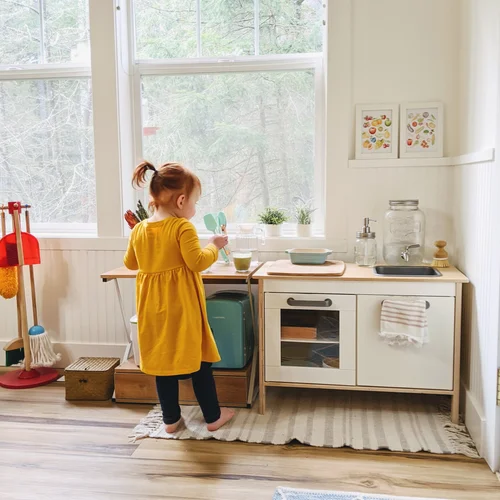
Make the kitchen larger with extra pieces. Add a small table or counter for more workspace. Build shelves for toy dishes, pots, and pans. Include a pretend fridge or oven using boxes or crates. Creating different zones, like a cooking area and cleaning spot, encourages role play. Expanding lets children invite friends and share the fun.
Credit: www.montessoriinreallife.com
Frequently Asked Questions
What Materials Are Needed To Build A Toy Kitchen?
You need wood, screws, paint, glue, and basic tools. Choose child-safe, durable materials. Include knobs, shelves, and a countertop for realism.
How Long Does It Take To Build A Toy Kitchen?
Building a toy kitchen usually takes 4 to 8 hours. Time depends on design complexity and your DIY skills. Planning and preparation can reduce total build time.
What Safety Features Should A Toy Kitchen Have?
Ensure all edges are smooth and corners rounded. Use non-toxic paint and secure small parts tightly. Avoid sharp tools and heavy pieces that may fall.
Can I Customize The Toy Kitchen Design?
Yes, customize size, color, and features to fit your space. Add personalized elements like chalkboards or storage bins. Customization makes the kitchen more engaging for kids.
Conclusion
Building a toy kitchen can bring joy and learning to children. It helps develop creativity and fine motor skills. You only need simple materials and some patience. Take your time and enjoy the process. Kids will love their new play space.
This project creates lasting memories and fun moments. Try it today and watch smiles grow.