Have you ever wanted to create something fun and colorful with your own hands? Making a kite craft is a simple and exciting way to do just that.
Imagine flying a kite you built yourself, feeling the breeze, and watching it dance in the sky. In this guide, you’ll discover easy steps to make your very own kite using materials you probably already have. Whether you’re crafting with kids or looking for a new hobby, this project will bring joy and a sense of achievement.
Ready to start? Let’s dive into how to make kite craft that’s both fun and rewarding!
Materials Needed
Gathering the right materials is the first step to making a sturdy and beautiful kite. Having everything ready not only saves time but also helps you focus on the fun part—crafting your kite. Think about what you already have at home and what might be easy to buy.
Basic Supplies
- Paper or Lightweight Fabric:Choose sturdy paper like craft paper or a light fabric such as ripstop nylon. These materials are easy to work with and hold up well in the wind.
- Wooden Dowels or Bamboo Sticks:These will form the frame of your kite. Bamboo sticks are flexible and strong, perfect for beginners.
- String or Twine:You need this to tie the frame and to fly the kite. Pick a strong, lightweight string to avoid breakage.
- Glue or Tape:Use glue for a clean finish, or tape for quick fixes. Clear tape works well to hold the paper or fabric in place.
- Scissors:Essential for cutting your materials to the right size and shape.
Optional Decorative Items
- Markers, Paints, or Stickers:Add color and personality to your kite. This step makes your kite truly unique.
- Ribbon or Lightweight Fabric Strips:Use these for the tail to help balance the kite and add flair.
- Hole Punch:Makes it easier to create holes for string attachment without tearing the material.
Safety And Comfort Tools
- Protective Gloves:If you’re handling sharp sticks or cutting materials, gloves protect your hands.
- Measuring Tape or Ruler:For accurate measurements to keep your kite balanced.
- Work Surface:A flat, clean area to lay out your materials and work comfortably.
Have you ever noticed how simple household items can turn into something that soars in the sky? What creative twist will you add to your kite with these materials?

Credit: www.attachmentmummy.com
Choosing The Right Design
Choosing the right design is a key step in making a kite craft. The design affects how the kite flies and how it looks in the sky. Simple shapes are easier to build and fly well. Complex patterns can make your kite stand out but might need more skill.
Think about the size and shape of your kite. These factors influence the kite’s balance and stability. A well-chosen design makes the craft fun and rewarding.
Classic Shapes For Easy Flying
Simple shapes like diamonds and triangles work well for beginners. These shapes are stable and easy to control. You can use basic materials and tools to make them. They also fly smoothly in light winds.
Creative Designs For Visual Impact
Creative designs include animals, stars, or geometric patterns. These shapes attract attention in the sky. They may need stronger frames or special materials. Creative kites can be a fun project for those who enjoy art and craft.
Material Choices That Match Designs
Paper, plastic, and fabric are common kite materials. Lightweight materials suit delicate or small kites. Sturdier materials work better for large or complex designs. Match your material to the design to ensure good flight.
Balancing Function And Style
Your kite should look good and fly well. Too much focus on style may reduce flight performance. A balanced design keeps the kite stable and attractive. Test small models before making your final kite.
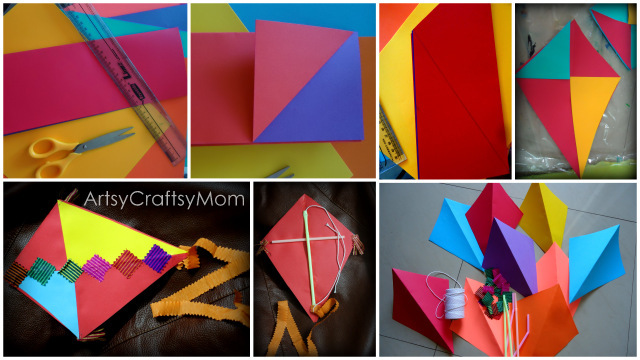
Step-by-step Instructions
Building your own kite is a rewarding project that brings out creativity and hands-on skills. Breaking down the process into clear steps makes it easier to follow and more fun to complete. Let’s dive into the essential parts that will bring your kite to life.
Creating The Frame
The frame is the backbone of your kite. Use lightweight materials like bamboo sticks or thin wooden dowels to keep it sturdy yet light. Cut two sticks to the desired length—one slightly longer for the vertical spine and a shorter one for the horizontal crossbar.
Lay the sticks in a cross shape and tie them tightly at the center using strong string or twine. Make sure the frame feels stable and doesn’t wobble. Have you checked that the crossbar is perfectly centered? This balance is crucial for a smooth flight.
Attaching The Sail
The sail catches the wind and lifts your kite. Cut a sheet of durable paper, plastic, or fabric slightly larger than your frame. Place the frame on top and fold the edges of the material over the sticks.
- Use glue or tape to secure the edges firmly to the frame.
- Ensure the sail is taut without wrinkles—it should feel tight like a drum.
- Double-check corners for any loose parts that might flap in the wind.
Have you noticed how a loose sail can affect control? Keeping it tight makes a big difference.
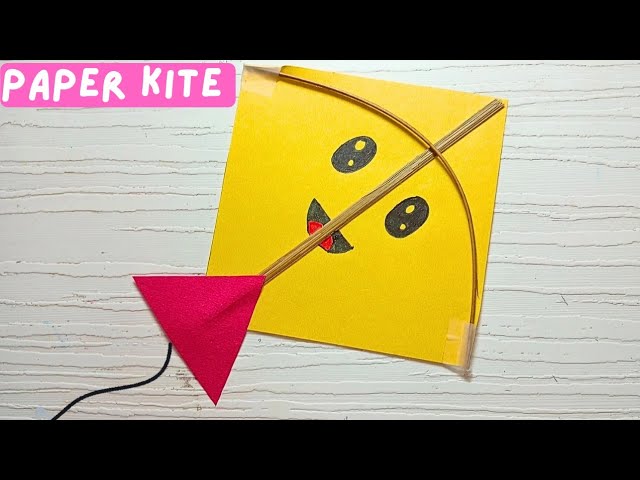
Adding The Tail
The tail adds stability and prevents your kite from spinning out of control. Cut strips of lightweight fabric, plastic ribbons, or even use a string with small pieces tied along it. Attach the tail to the bottom of the vertical stick.
Start with about 3 to 5 feet of length, depending on your kite’s size. You can add small bows or knots along the tail to increase drag if needed. Try flying your kite without a tail—did it wobble? Adding the right tail fixes that instantly.
Credit: artsycraftsymom.com
Decorating Your Kite
Decorating your kite is where creativity takes flight. It’s not just about making your kite look good—it’s about expressing your style and making your kite easy to spot in the sky. The right decorations can also help balance your kite and improve its flight.
Using Paints And Markers
Choose bright, vibrant colors that stand out against the blue sky. Acrylic paints work well because they dry quickly and stick to most kite materials. Markers are great for adding fine details or patterns that paint can’t achieve easily.
Try painting bold shapes like stars or stripes to create a dynamic look. Use waterproof markers or seal your paint with a clear spray to prevent smudging. Have you ever noticed how a well-decorated kite can catch the wind differently? Sometimes, heavier paint can change how your kite behaves, so keep the layers thin.
Adding Ribbons And Streamers
Ribbons and streamers add motion and personality to your kite. Attach them to the tail or the corners using tape or string. Longer ribbons create more dramatic movement, while shorter ones add a playful touch.
- Use lightweight materials so they don’t weigh down your kite.
- Mix colors that contrast with your kite’s body to make the decorations pop.
- Securely knot or tape the ribbons to avoid losing them mid-flight.
Think about the wind conditions you’ll be flying in. Gentle breezes call for delicate, flowing ribbons, while stronger winds can handle thicker, sturdier streamers. Have you tried watching how the ribbons dance in the wind? It’s a simple way to see how your kite interacts with the air around it.
Safety Tips For Flying Kites
Flying kites is a fun outdoor activity for all ages. It brings joy and fresh air. Safety must come first to avoid accidents and injuries. Following simple safety tips helps keep everyone safe and happy.
Use these safety tips for a smooth and fun kite flying experience.
Choose An Open Area Away From Power Lines
Fly kites in large, open spaces like parks or fields. Stay far from power lines and electrical poles. Kites can conduct electricity and cause serious harm. Open areas reduce the risk of accidents.
Avoid Flying Kites In Stormy Weather
Do not fly kites during rain or thunderstorms. Wet kite strings can conduct electricity. Strong winds can make kites hard to control. Pick calm and clear days for kite flying.
Use Safe And Strong Kite Strings
Pick kite strings that are strong but safe to handle. Avoid metal wires or sharp strings. These can cut hands or cause injuries. Cotton or nylon strings work best for safety.
Keep Distance From Roads And Crowds
Fly kites away from busy roads and crowded places. Kites and strings can distract drivers or hurt people. Open and quiet spots are safer for kite flying fun.
Watch Out For Trees And Obstacles
Avoid flying kites near trees, buildings, or poles. Kites can get stuck or tangled. This may cause damage or accidents. Clear spaces help keep the kite flying smoothly.
Handle Kite Strings Carefully
Hold the kite string firmly but gently. Do not wrap strings around fingers or wrists. Strong wind can pull and cause cuts or injuries. Use gloves if needed for better grip and safety.

Credit: www.youtube.com
Troubleshooting Common Issues
Troubleshooting common issues in kite crafting helps keep your kite flying high. Small problems can stop your kite from soaring. Fixing these issues early saves time and money. This guide covers simple fixes for tears, breaks, and flight problems.
Handling Tears And Breaks
Tears and breaks happen often in kites. Use strong tape like duct or kite tape to fix tears. Cut a patch slightly larger than the hole. Place the patch on both sides of the tear for strength.
For broken frames, replace damaged sticks with similar materials. Use lightweight wood or plastic rods. Secure the new piece with string or glue. Check the frame for stability before flying again.
Improving Flight Performance
Poor flight often comes from uneven balance or wrong string tension. Adjust the bridle point by moving it slightly up or down. This changes the kite’s angle to the wind.
Make sure the tail is the right length and weight. A longer tail adds stability, while a shorter one allows quick turns. Test different tail sizes to find the best balance.
- Use light string to avoid extra weight.
- Fly in steady wind conditions for better control.
- Check for smooth, even surfaces on the kite.
Advanced Techniques
Advanced techniques in kite crafting bring new excitement and challenges. They allow more creativity and better flying performance. Trying different shapes and materials can lead to unique designs. These ideas help build kites that are strong and beautiful.
Experimenting With Shapes
Changing the kite shape affects how it flies. Traditional diamond shapes are simple to build and stable. Try box kites for better lift and strength. Delta kites work well in light winds. Curved or asymmetrical shapes create interesting flight patterns.
Use templates to cut and test new shapes. Small changes can make a big difference in flight. Balance is important for all shapes. Check the kite’s center of gravity before flying.
Using Different Materials
Materials affect the kite’s weight and durability. Lightweight paper is easy to handle but tears quickly. Plastic sheets resist water and last longer. Fabric like nylon adds strength and flexibility.
Use bamboo or thin wood sticks for the frame. Carbon fiber rods offer extra strength and lightness. String choice matters too; nylon or polyester strings are strong and smooth. Experimenting with materials helps create kites suited for different weather.
Frequently Asked Questions
What Materials Are Needed To Make A Kite Craft?
To make a kite craft, you need lightweight paper, wooden sticks, string, glue, and scissors. These basic materials help create a sturdy yet light kite perfect for flying.
How Do You Assemble A Basic Kite Frame?
Assemble the kite frame by crossing two wooden sticks in a “T” shape. Secure them tightly with string or glue for stability.
What Is The Best Paper For Kite Making?
Lightweight and durable papers like tissue paper or kite-specific paper work best. They are easy to decorate and strong enough to fly.
How Can I Decorate My Kite Craft Creatively?
Use markers, paint, stickers, or colored paper to decorate your kite. Personalize it with patterns or drawings to make it unique and vibrant.
Conclusion
Making a kite craft is fun and simple for everyone. You only need a few materials to start. Follow the steps carefully and enjoy the process. Flying your kite gives a great feeling of joy and pride. Try different colors and shapes to make it unique.
Crafting helps improve focus and creativity too. Share your kite with friends or family for extra fun. Keep practicing to make better and stronger kites. This activity brings happiness and a chance to enjoy outdoors. Give kite making a try today!