In this guide
Are you ready to bring your dolls to life with smooth, flexible movement? Making ball joints for dolls can seem tricky at first, but with the right steps, you can create joints that look professional and work perfectly.
Imagine giving your dolls the ability to pose naturally, making them more lifelike and fun to play with or display. In this guide, you’ll discover simple, clear instructions that anyone can follow, even if you’ve never tried this before. Keep reading, and you’ll soon master the skill that takes your doll-making to the next level.

Credit: www.youtube.com
Materials Needed
Gathering the right materials is a crucial step before you start making ball joints for your dolls. The quality and type of materials you choose will directly impact the durability and smoothness of the joints. Let’s break down what you need to get your project moving efficiently and effectively.
Tools And Equipment
Having the right tools makes the process smoother and more precise. You’ll need:
- Craft knife– for cutting and shaping small parts.
- Needle files– to refine edges and smooth surfaces.
- Pin vise or small drill– to create holes for joint assembly.
- Sandpaper– fine grit for polishing the joints.
- Mixing paletteand sculpting tools– for working with clay.
Do you have a dedicated workspace? Keeping these tools organized and accessible will save time and prevent frustration during your crafting.
Types Of Clay
The choice of clay affects the joint’s strength and flexibility. Here are some popular options:
- Polymer clay– easy to shape and bake hard, perfect for detailed parts.
- Air-dry clay– no baking needed, but less durable for moving joints.
- Epoxy clay– extremely strong and durable, ideal for long-lasting joints.
I’ve found that polymer clay offers a good balance between workability and strength, especially if you’re new to joint making. What qualities do you value most in your doll’s joints?
Other Essentials
Besides tools and clay, some additional materials help bring your ball joints to life:
- Small metal pins or ball bearings– these act as the pivot points inside the joints.
- Super glue or strong adhesive– to secure parts together firmly.
- Paint and sealant– for finishing touches and protecting your work.
Don’t underestimate the role of quality adhesives. If your joints come apart too easily, it can ruin the whole effort. Have you tried different adhesives to see which hold best on your doll materials?
Credit: www.lumberjocks.com
Designing The Ball Joint
Designing the ball joint is a crucial step in making dolls that move naturally and hold poses well. This part affects how smoothly the doll’s limbs rotate and how durable the connection will be. Taking time to plan your design carefully ensures your doll will have both flexibility and strength.
Choosing The Right Size
Your ball joint size directly impacts the doll’s mobility and stability. Too small, and the joint might be weak or prone to breaking. Too large, and it could look bulky or restrict movement.
Think about the doll’s overall size and the thickness of its limbs. You want the ball to fit snugly in the socket without forcing it. If you’ve ever struggled with a joint that was too loose or tight, you know how important this balance is.
Measure the diameter of the limb where the joint will go. Match the ball’s diameter to be slightly smaller than the socket’s inner diameter. This allows smooth rotation while keeping a firm grip.
Sketching The Design
Sketching your ball joint helps you visualize how parts fit together before cutting or molding anything. Draw the ball, socket, and how they connect in different angles. This step saves time and material by spotting potential issues early.
Use simple shapes and label dimensions clearly. Mark where the joint will pivot and where you’ll add any grooves or notches to hold it in place. Sketching also lets you experiment with variations to find the best fit.
Try drawing a cross-section to see how deep the socket needs to be for secure movement. You might notice that increasing socket depth or adding a locking ridge could improve joint stability. Have you ever found a sketch revealing a problem you didn’t expect?
Sculpting The Ball Joint
Sculpting the ball joint is a crucial part of making dolls that move naturally. This stage shapes the core of the joint, allowing smooth rotation and durability. You’ll need patience and attention to detail to get it just right.
Forming The Basic Shape
Start by molding a small clay ball that fits comfortably in your doll’s socket. The size needs to be precise — too big and it won’t move well; too small and it’ll be loose. I found using polymer clay works best because it’s easy to shape and hardens reliably.
Roll the clay between your fingers to create a smooth sphere. Avoid fingerprints or cracks, as these can weaken the joint later. Keep checking the fit by placing it gently in the socket to see how it moves.
Refining Details
Once the basic ball is formed, refine the shape with fine tools like a needle or toothpick. Carve out a shallow groove around the middle to help the joint lock in place. This groove keeps your doll’s limbs from slipping off while allowing rotation.
Use a small piece of sandpaper to smooth out any rough spots. At this stage, test the joint repeatedly with your doll’s socket to ensure it fits snugly but moves freely. Have you noticed how tiny adjustments can change the entire feel of the movement?
Creating The Socket
Creating the socket is a key step in making ball joints for dolls. The socket holds the ball securely while allowing smooth movement. It must be shaped carefully to fit the ball perfectly. A well-made socket ensures the joint moves freely without falling apart.
Molding The Socket
Start by choosing a flexible material like silicone or soft plastic. Use a small mold or carve the shape by hand. The socket should be hollow and round, matching the size of the ball. Keep the walls thin but strong enough to hold the ball in place. Smooth the inside surface to reduce friction during movement.
Ensuring Proper Fit
Test the ball inside the socket frequently during making. The ball should snap in but still rotate easily. If the socket is too tight, the joint will be stiff. If too loose, the ball will fall out. Adjust the socket size by trimming or adding material. Check the fit from different angles to ensure smooth motion.
Assembling The Joint
Assembling the ball joint is a delicate task. It requires precision and patience. This step connects the doll’s parts and allows smooth movement. Proper assembly ensures the joint fits well and functions correctly. Use clean tools and work on a flat surface. Align each piece carefully before pressing them together.
Testing Movement
After assembly, test how the joint moves. Gently rotate and bend the joint in all directions. The movement should be smooth and flexible. Check for any stiffness or unusual resistance. The joint must hold positions without slipping. If it feels too loose, it may need tightening.
Adjusting Tightness
Tighten the joint to achieve the right balance. Use small tools to press or adjust the parts. Avoid over-tightening, which can cause damage or breakage. Slightly loosen if the joint feels stuck or too stiff. Test movement after each adjustment. Aim for a firm but smooth joint action.
Finishing Touches
Finishing touches bring your ball joints to life, making them both durable and visually appealing. This stage is where you add that final layer of care and precision. It’s essential to focus on details that enhance both function and appearance.
Painting And Sealing
Painting your ball joints not only adds color but also protects the material from wear and tear. Use acrylic paints for a smooth finish that won’t crack easily. Thin layers work best—apply several coats, allowing each to dry fully before adding the next.
Sealing is just as important as painting. A clear sealant will lock in your paint and prevent chipping over time. Choose a matte or glossy finish depending on the look you want for your doll’s joints.
Think about the doll’s environment. Will it be handled often? If yes, a stronger sealant will save you from frequent touch-ups. Have you tested your sealant on a sample piece first? This simple step can save you from unexpected reactions.
Final Quality Check
After painting and sealing, inspect each ball joint carefully. Look for any rough edges or paint drips that could affect movement or aesthetics. Smooth out imperfections with fine sandpaper or a small file.
Test the joints for flexibility and strength. Move them through their full range of motion to ensure they don’t stick or loosen. If you find any issues, adjust the tension or reassemble the parts as needed.
Remember, a good final check saves frustration later. What would you want to feel or see if this were your doll? Use that as your standard to make sure your ball joints are flawless and ready to impress.
Tips And Tricks
Making ball joints for dolls requires care and patience. Small details make a big difference in how well the joints move and last. Use these tips and tricks to improve your crafting process. They help avoid common errors and keep your doll’s joints working smoothly for a long time.
Common Mistakes
- Using too much glue can block joint movement.
- Choosing the wrong size ball makes joints too loose or tight.
- Not sanding parts properly causes rough surfaces and poor fit.
- Forgetting to test joint movement before final assembly.
- Using weak materials that break under stress.
Maintenance Advice
Check doll joints regularly for wear or damage. Clean joints gently with a soft cloth to remove dust.
Apply a tiny drop of lubricant like silicone oil to keep movement smooth. Avoid harsh chemicals that can damage materials.
Store dolls in a dry place to prevent rust or mold on metal or fabric parts.

Credit: www.youtube.com
Frequently Asked Questions
What Materials Do I Need For Making Doll Ball Joints?
You need small beads, elastic cords, glue, and doll limbs. Choose durable materials for smooth joint movement and longevity.
How Do I Assemble Ball Joints For Dolls?
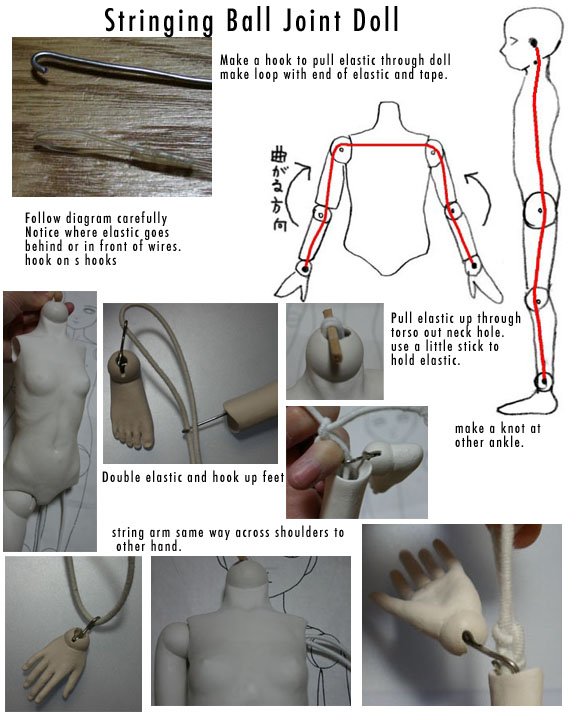
Insert beads between doll limbs and secure with elastic cords. Use glue to fix parts tightly for stable joints.
Can I Customize Ball Joints For Different Doll Sizes?
Yes, adjust bead size and cord length to fit various doll sizes. Customizing ensures proper fit and flexibility.
How Do I Ensure Durability In Doll Ball Joints?
Use strong elastic cords and high-quality beads. Apply glue carefully and allow drying time to enhance joint strength.
Conclusion
Making ball joints for dolls takes patience and care. Small steps help create strong, flexible joints. Use simple tools and materials to save time and money. Practice makes your joints move smoothly and last longer. Enjoy crafting and personalizing your dolls with your own handmade parts.
Keep trying and improving with each new doll you build. This skill adds fun and value to your doll-making projects.