In this guide
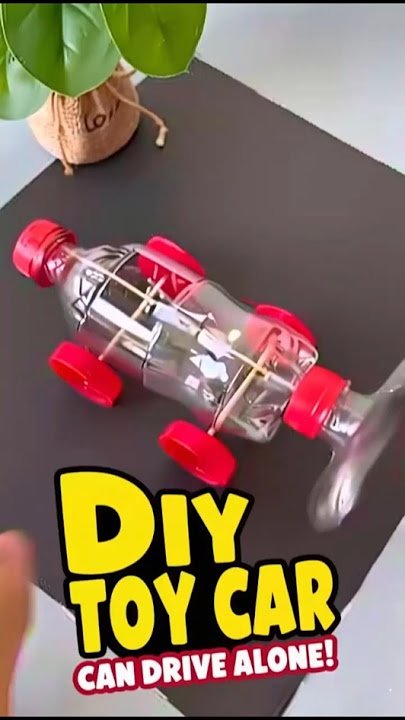
Have you ever wanted to create something amazing with your own hands? Building a toy car from scratch is a fun and rewarding project you can do step by step.
Imagine the pride you’ll feel as you watch your creation roll across the floor, knowing you made it all by yourself. In this guide, you’ll discover simple instructions and tips that make the process easy and enjoyable, even if you’ve never built anything before.
Ready to bring your toy car to life? Let’s get started!

Credit: www.youtube.com
Materials Needed
Gather basic items like wood, wheels, nails, and paint to create a toy car. Simple tools such as a hammer and glue will also help in the building process. Choose materials that are safe and easy to handle for best results.
Building a toy car from scratch is a fun and rewarding project that can spark creativity and boost your hands-on skills. Whether you’re a hobbyist, a parent looking for a unique activity, or a student eager to explore engineering principles, gathering the right materials is crucial to ensuring a successful build. This section will guide you through the essential components you’ll need to bring your toy car to life.Basic Tools
To embark on this project, you’ll need a few basic tools to assist you in assembling and shaping your toy car. A screwdriver set is indispensable for tightening screws and securing parts. A small hammer can be handy for attaching and adjusting components. Don’t forget a pair of pliers for gripping and bending materials as needed. For precision, a measuring tape or ruler is essential to ensure your car is proportionate and functional. A small drill can aid in creating holes for screws and axles. Lastly, glue or adhesive is necessary for holding parts together; opt for a type that is safe for children if they will be involved in the process.Raw Materials
The heart of your toy car lies in the raw materials you choose. Start with a lightweight chassis, which can be crafted from wood, plastic, or sturdy cardboard. Wheels are crucial, and you can choose between rubber, plastic, or even wooden wheels, depending on the aesthetic and functionality you desire. Axles, often made from metal or hard plastic, will connect the wheels to the chassis. Consider using a small motor or rubber bands for propulsion if you want your car to be motorized. You may also need screws and nuts to secure parts together and ensure stability. Paints and decorative elements can personalize your toy car, adding flair and uniqueness.Safety Gear
Safety should never take a backseat in DIY projects. Ensure you have safety goggles to protect your eyes from dust or accidental splashes. Gloves can safeguard your hands from sharp edges and hot glue. A dust mask is advisable if you’re cutting or sanding materials, preventing inhalation of particles. Consider setting up a well-lit workspace to avoid accidents and ensure precision. If children are involved, supervise closely to teach them safety practices and keep sharp tools out of their reach. Are you prepared with your safety gear, ready to dive into crafting your toy car? Remember, a safe environment fosters creativity and enjoyment.Designing Your Toy Car
Designing your toy car is where creativity meets precision. This stage sets the foundation for everything that follows, so it’s important to think clearly about what you want your car to look like and how it should function. A well-thought-out design saves time and material, and makes the building process more enjoyable.
Choosing A Car Style
Decide on the overall look of your toy car first. Do you want a sleek sports car, a rugged off-roader, or maybe a classic vintage model? Each style has unique shapes and features that will influence your design choices.
Think about what excites you the most. Are you drawn to smooth curves or sharp angles? Picking a style that reflects your personality will keep you motivated throughout the build.
Sketching The Blueprint
Put your ideas on paper by sketching a simple blueprint. It doesn’t need to be perfect art—just clear enough to guide you. Draw the car from different angles to visualize how the parts connect.
Use pencil and eraser so you can adjust your design as new ideas come. This step helps you spot potential problems early, like wheels that might be too close or a body shape that’s hard to cut.
Selecting Dimensions
Decide the size of your toy car. Think about the length, width, and height based on the materials you have and how you want the car to fit in your hand.
Write down exact measurements for each part. This precision prevents mistakes and makes cutting or assembling easier. Are you aiming for a compact car that fits in your pocket or a larger model with more detail?
Cutting And Shaping Parts
Cutting and shaping parts is a key stage in building a toy car. It gives the car its form and style. Precise cutting ensures the parts fit well together. Shaping adds smoothness and detail for a better look. Use the right tools and work carefully to avoid mistakes.
Preparing The Body
Start by choosing a solid block of wood or sturdy plastic. Mark the car’s outline with a pencil. Use a saw or craft knife to cut along the lines. Cut slowly to keep the shape clean. Remove any large rough spots before moving on. Check the size and shape often as you cut.
Crafting The Wheels
Select round pieces of wood or plastic for the wheels. Trace circles using a round object like a bottle cap. Cut the circles carefully with a small saw or scissors. Make sure all wheels are the same size. Drill small holes in the center for the axles. Keep the holes straight for smooth spinning.
Smoothing Edges
Use sandpaper to smooth all rough edges and surfaces. Start with coarse grit to remove big bumps. Move to finer grit for a soft, polished finish. Smooth edges prevent splinters and improve the car’s look. Pay special attention to corners and curves. Clean the parts with a cloth after sanding to remove dust.
Assembling Components
Assembling the components of your toy car is where all your planning and preparation come together. This stage transforms separate parts into a functioning miniature vehicle. Focusing on precise attachment and stability ensures your car not only looks great but also rolls smoothly.
Attaching Wheels To Axles
Start by sliding the wheels onto the axles carefully. Make sure the wheels fit snugly but still spin freely. If the wheels are too tight, they won’t roll well; too loose, and they might fall off.
Use small washers or spacers if needed to reduce friction between the wheels and the car body. This simple adjustment can make a big difference in how smoothly your car moves. Have you checked if both wheels on the same axle rotate evenly?
Fixing The Body
Attach the car’s body to the chassis using screws, glue, or clips depending on your design. Pay attention to alignment so the body doesn’t tilt or shift when the car moves. A well-fixed body keeps the car balanced and protects internal parts.
If you’re using glue, apply it sparingly to avoid messy drips that can interfere with moving parts. Clamping or holding the body in place while the glue dries helps ensure a strong bond. What method do you find easiest for attaching parts securely?
Ensuring Stability
Check your toy car’s stability by placing it on a flat surface and giving it a gentle push. The car should roll straight without wobbling or tipping over. If it leans to one side, adjust the wheels or body position accordingly.
Adding small weights inside the body can improve balance, especially if the car tips too easily. Think about where the center of gravity should be—usually low and centered. How stable does your car feel when you test it on different surfaces?
Painting And Decorating
Painting and decorating your toy car is where the project truly comes alive. This stage transforms a simple wooden or plastic frame into a vibrant, personalized masterpiece. Your choices here will affect not only the look but also the durability of your toy car.
Choosing Paint Types
Picking the right paint is crucial. Acrylic paints are a great option because they dry quickly and are non-toxic, making them safe for kids’ toys.
Spray paints offer a smooth, even finish but require good ventilation and careful application to avoid drips. Consider enamel paints if you want a glossy, durable surface that resists scratches.
Have you thought about the surface material of your car? Wood absorbs paint differently than plastic, so testing on a small area first can save frustration later.
Applying Base Coats
Start with a clean, dry surface—sandpaper works wonders to smooth rough spots. A base coat evens out the surface and enhances the topcoat’s color.
Use thin, even layers to prevent paint from pooling or cracking. Let each coat dry fully before adding the next; patience here pays off in a professional finish.
Try using a primer if your surface is porous—it helps the paint stick better and prevents colors from fading.
Adding Details
This is where your creativity shines. Use fine brushes or paint markers to add stripes, flames, or even your initials.
Stickers and decals can also add cool effects without the mess. Seal your artwork with a clear varnish to protect it from chips and scratches.
What small detail could make your toy car uniquely yours? Sometimes, it’s the tiniest touch that makes the biggest impression.

Credit: www.youtube.com
Final Touches
Final touches bring your toy car project to life. This stage lets you add personality and ensure it runs smoothly. Paying attention here can turn a simple build into a cherished creation.
Adding Stickers Or Decals
Stickers or decals can give your toy car a unique look. Choose designs that match the style you want, whether it’s racing stripes or fun characters.
Apply them carefully to avoid bubbles or wrinkles. Use a soft cloth to press them down firmly and smooth out any imperfections.
Have you thought about customizing your own decals? Simple designs printed on sticker paper can make your car truly one-of-a-kind.
Testing The Toy Car
Testing is key to see how well your toy car performs. Find a smooth surface and give it a gentle push to observe its movement.
Check if the wheels roll straight and the car stays balanced. Listen for any unusual noises that might indicate friction or loose parts.
Try different surfaces to understand where your car performs best. This hands-on testing often reveals small tweaks that improve speed and stability.
Troubleshooting Common Issues
If your car doesn’t roll smoothly, look for tight spots in the wheels or axles. Sometimes a bit of sanding or lubrication can fix this quickly.
Loose parts can cause wobbling or noise; tighten screws or use glue to secure them better. Make sure the wheels are aligned properly to avoid veering off course.
What’s the most stubborn problem you’ve faced while building? Tackling these challenges sharpens your skills and makes the final product more satisfying.
Tips For Customization
Customizing your toy car makes the building process more exciting and personal. It lets you add unique touches that reflect your style and creativity. Here are some practical ways to make your toy car stand out from the rest.
Using Alternative Materials
Think beyond the usual wood or plastic. Materials like recycled cardboard, metal scraps, or even old toys can give your car a fresh look and feel. I once used bottle caps for wheels, and it not only saved money but added a cool vintage vibe.
Try mixing materials for different parts. For example, a metal chassis with wooden body panels creates an interesting contrast. What unusual materials can you find around your home to give your toy car a unique edge?
Incorporating Moving Parts
Adding moving parts can bring your toy car to life. Simple wheels that spin are a good start, but you can also include doors that open or a steering mechanism. I added a spring-loaded suspension once, which made the ride bumpy and fun—kids loved it.
Use small hinges, rubber bands, or tiny screws to create these movements. Think about what parts of a real car you want to mimic. How can you make your toy car more interactive and fun to play with?
Personalizing Design
Personal touches make your toy car truly yours. Paint it with your favorite colors, add stickers, or carve your initials into the body. I remember painting flames on my car as a kid—it made it feel fast, even when it wasn’t.
Consider themes like race cars, vintage models, or futuristic designs. You can also add miniature accessories like spoilers or tiny headlights. What story do you want your toy car to tell through its design?

Credit: www.youtube.com
Frequently Asked Questions
What Materials Do I Need To Build A Toy Car?
You need wood or plastic for the body, wheels, axles, glue, paint, and simple tools like a saw and screwdriver.
How Long Does It Take To Build A Toy Car?
Building a toy car usually takes 2 to 4 hours, depending on complexity and your skill level.
Can Kids Safely Build A Toy Car From Scratch?
Yes, with adult supervision, kids can safely build toy cars using child-friendly tools and materials.
What Basic Skills Are Required To Build A Toy Car?
Basic skills include measuring, cutting, gluing, and simple assembly, which are easy to learn and apply.
Conclusion
Building a toy car from scratch takes patience and care. Start with simple steps and use safe materials. Each part you create makes the car unique and special. Enjoy the process, and learn from small mistakes. This project helps improve your skills and creativity.
Keep practicing, and soon you can make even better toys. Have fun building and sharing your toy car with friends or family. This hands-on activity brings joy and a sense of achievement. Try new ideas and keep exploring different designs.