In this guide
Have you ever dreamed of creating something amazing with your own hands? Building a house with toy blocks is not only fun but also a great way to boost your creativity and focus.
Imagine turning simple blocks into a cool, sturdy structure that you can be proud of. In this guide, you’ll discover easy steps to bring your ideas to life and avoid common mistakes. Ready to unlock your inner builder and impress everyone with your block house?
Let’s get started!
Choosing The Right Toy Blocks
Building a house with toy blocks can be a delightful activity. Choosing the right toy blocks is essential for both fun and safety. Different types of toy blocks offer unique benefits. Understanding these helps create a perfect play experience.
Types Of Blocks
Toy blocks come in various materials. Wooden blocks are durable and offer a classic feel. Plastic blocks are often colorful and easy to clean. Foam blocks are soft and safe for young children. Each type has its own advantages. Consider the age and preferences of the child.
Block Sizes And Shapes
Block sizes and shapes influence creativity and construction. Large blocks are easier to handle for small hands. They are ideal for building big structures. Small blocks offer intricate design possibilities. Shapes like rectangles and squares provide stability. Curved and angled pieces add diversity to designs.
Safety Considerations
Safety is paramount when selecting toy blocks. Avoid blocks with sharp edges. Ensure blocks are large enough to prevent choking hazards. Check for non-toxic materials. Look for certifications that guarantee safety standards. Always supervise young children during playtime.
Planning Your House Design
Planning your house design is the first step to building a toy block house. It helps you create a clear vision. This makes building easier and more fun. A good plan saves time and blocks.
Simple House Shapes
Start with basic shapes like squares and rectangles. These shapes are easier to build and stack. Triangles work well for roofs. Simple shapes keep your house stable. They help avoid block falls and gaps. You can combine shapes for a unique look.
Deciding The Size
Choose a size that fits your space. Small houses need fewer blocks and less time. Large houses look impressive but need more blocks. Think about the number of rooms and floors. Plan enough space for doors and windows. Size affects how detailed your house can be.
Using Colors Creatively
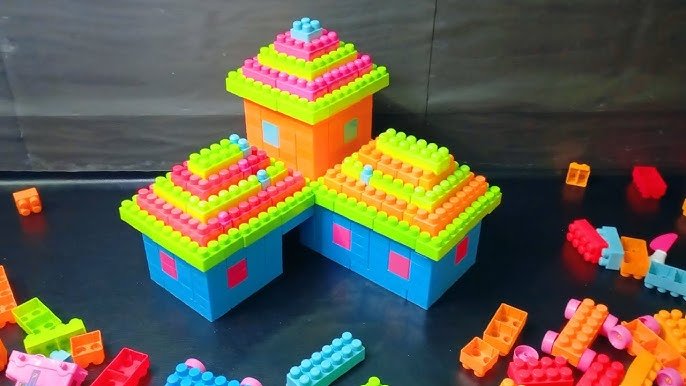
Colors bring your toy house to life. Use bright colors for walls to catch the eye. Mix colors to create patterns or stripes. Use different colors for doors and windows. Color variety makes the house look fun and lively. Plan your colors before building to avoid mistakes.
Preparing The Building Area
Preparing the building area is an important first step in creating a house with toy blocks. A clean, organized space helps keep blocks within reach. It also prevents distractions and keeps the project fun. Taking time to set up a good workspace improves focus and speeds up building.
Clearing A Flat Surface
Find a flat surface large enough for your house. Clear off any items that may get in the way. A table or floor space works well. Make sure the surface is sturdy and steady. Smooth surfaces make blocks stick better and reduce wobbling. Avoid uneven or soft areas like carpets or beds.
Organizing Blocks
Sort blocks by size, color, or shape. Use small containers or trays to keep them tidy. Grouping blocks helps you find pieces quickly. It also saves time during building. Try to keep the most-used blocks closest to your building spot. This way, you won’t waste energy searching for parts.
Setting Up A Work Space
Create a space with good lighting to see details clearly. Make sure there is enough room to move around comfortably. Keep tools, like block separators, nearby if you use them. Add a small chair or cushion for comfort during long sessions. A calm, dedicated workspace boosts creativity and helps you focus.

Credit: www.youtube.com
Building The House Base
Building the base of your house with toy blocks is the key to a sturdy and lasting structure. The base supports everything above it, so it needs to be strong and well-planned. Taking your time here can save you from frustrating collapses later on.
Laying A Strong Foundation
Start by choosing a flat surface to build on. Uneven ground can cause the whole house to wobble or fall. Use larger blocks for the foundation—they offer better support and stability.
Try to create a rectangular or square shape for your base. This shape distributes weight evenly, making your house more solid. Think about how real houses use wide bases for support—your toy blocks work the same way.
Stacking Blocks Evenly
Place each block carefully so it lines up perfectly with the ones below. Uneven stacking leads to weak spots and gaps that can cause your house to topple. Pay attention to the edges; blocks hanging over the side reduce balance.
Keep your hands steady and take your time with each layer. If you notice a block tilting, adjust it immediately before adding more blocks on top. A smooth, even stack feels more secure as you build higher.
Checking Stability
After laying down a few layers, gently press on different parts of your base. Does it shake or shift? Small movements mean you need to reinforce those spots. Add extra blocks or adjust alignment until the base feels firm.
Ask yourself: If you lightly tap the table, will your base stay put? If not, take a moment to strengthen it. Stability at the base will make the entire building process smoother and more enjoyable.
Constructing Walls And Roof
Constructing the walls and roof is where your toy block house starts to take real shape. This part requires patience and attention to detail. The way you stack your blocks will determine the stability and look of your miniature home.
Building Walls Layer By Layer
Start by laying a strong foundation with the first layer of blocks. Make sure the blocks fit snugly together without gaps to keep the walls sturdy.
As you add layers, stagger the blocks like bricks in a real wall. This overlapping technique increases strength and prevents the wall from easily toppling.
Don’t rush this part—take your time to align each block properly. Have you noticed how even a slight misalignment can affect the entire structure’s balance?
Adding Windows And Doors
Windows and doors bring life and realism to your block house. Plan their placement before building too high to avoid awkward gaps later.
Use smaller blocks or leave intentional spaces to create these openings. You can also add different colored blocks around these spots to highlight them.
Think about how windows and doors affect your house’s design and stability. Have you tried adding a window frame with thinner blocks for extra detail?
Creating The Roof
The roof is the final touch that completes your toy block house. You can build a flat roof by layering blocks evenly across the top.
For a pitched roof, try stacking blocks in a triangular shape on each side, meeting in the middle. This requires careful balancing but looks more like a real house roof.
Experiment with different roof styles to see what fits your house best. What kind of roof design will you try first to make your creation stand out?

Credit: www.youtube.com
Adding Details And Decorations
Adding details and decorations brings your toy block house to life. It transforms a simple structure into a charming and unique creation. Small touches make the house more interesting and realistic.
Details create texture and depth. Decorations show personality and style. Both make the building process more fun and rewarding.
Using Small Blocks For Features
Small blocks work great for adding windows, doors, and roof tiles. Use different colors to highlight these features. Arrange tiny blocks to form patterns or shapes. This adds realism and visual interest. Small blocks also help create furniture or fences around the house.
Personalizing With Accessories
Accessories make your house special. Add miniature plants, flags, or lights made from small parts. Use stickers or tiny figures to create scenes. Personal items tell a story about who lives there. These details capture attention and make your design stand out.
Encouraging Creativity
Encourage trying new ideas without fear. Mix colors and shapes in new ways. Build unusual features like towers or balconies. Let imagination guide the design process. Creativity makes building enjoyable and unique. Every detail reflects your own style and vision.
Tips For A Successful Build
Building a house with toy blocks can be a fun and rewarding experience, but success depends on your approach. Paying attention to small details and staying patient will make a big difference. Here are some practical tips to help you create a sturdy and impressive structure.
Working Slowly And Carefully
Rushing through your build can cause blocks to fall or the structure to become unstable. Take your time to place each block precisely where it fits best. Notice how slight adjustments can improve the overall balance of your house.
Have you ever noticed how a small wobble early on can turn into a big collapse later? Being careful from the start prevents that. Focus on steady hands and deliberate movements to keep your build solid.
Asking For Help When Needed
Sometimes, a fresh pair of eyes can spot problems you might miss. Don’t hesitate to ask a friend or family member for advice or assistance. Teamwork can speed up the process and make the project more enjoyable.
Even experienced builders need help with tricky sections. If a part feels complicated, ask someone to hold blocks steady while you add others. Sharing ideas often leads to better solutions.
Keeping Blocks Organized
Sorting your blocks by size, color, or shape saves time and reduces frustration. When you know where to find each piece, your workflow becomes smoother. Try using small containers or trays to keep your blocks neatly arranged.
Have you ever lost track of the exact block you need? Organizing your pieces prevents that. A tidy workspace helps you focus on creativity instead of searching for parts.

Credit: www.youtube.com
Frequently Asked Questions
How Do I Start Building A House With Toy Blocks?
Begin by selecting a flat surface and sorting your blocks by size and color. Plan your design first. Lay a strong foundation with larger blocks. Build walls evenly for stability. Add details last, like windows or doors, for a realistic look.
What Are The Best Toy Blocks For Building Houses?
Choose blocks that interlock firmly, like LEGO or Mega Bloks. Avoid slippery or uneven pieces. Ensure blocks are durable and child-safe. Larger blocks suit younger builders. Smaller, detailed blocks help with intricate designs for advanced builders.
How Can I Make My Toy Block House More Stable?
Use a wide base with larger blocks to support weight. Stack blocks evenly and press them firmly together. Reinforce corners by overlapping blocks. Avoid tall, narrow structures prone to tipping. Adding a flat, sturdy roof helps balance the structure.
Can I Create Complex Designs With Toy Blocks?
Yes, complex designs are possible with planning and patience. Use a mix of block sizes and shapes. Follow building guides or create blueprints. Practice building smaller sections first. Experiment with symmetry and layering for advanced effects.
Conclusion
Building a house with toy blocks is fun and creative. It helps improve focus and hand skills. Start with a strong base and build up slowly. Use different shapes and colors to make it unique. Don’t rush; enjoy each step of the process.
This activity suits all ages and brings joy. Try new designs and share your work with friends. Keep practicing to build bigger and better houses. Simple blocks can spark great ideas and learning. Give it a try and watch your creativity grow.