In this guide
Have you ever wanted to create a toy that brings joy and sparks imagination? Building your own toy can be a fun and rewarding experience, whether it’s for yourself, a child, or a special gift.
Imagine holding something you made with your own hands—a toy that’s unique and full of personality. You’ll discover simple steps and tips to help you build a toy from start to finish. Ready to turn your ideas into a playful reality?
Let’s get started!
Materials Needed
Gathering the right materials is crucial before you start building your toy. The quality and type of materials you choose will directly affect the durability, safety, and overall look of your creation. Think about the toy’s purpose and the age group it’s meant for to guide your material selection.
Basic Craft Supplies
Start with simple items you probably already have at home. Scissors, glue, tape, and markers are essentials for almost any toy-building project. These tools help you shape, join, and decorate your toy with ease.
- Scissors:Sharp enough to cut various materials cleanly.
- Glue:Choose between hot glue, craft glue, or wood glue based on the material.
- Tape:Masking tape or duct tape for temporary holds or reinforcement.
- Markers or Paints:For adding color and personality.
Materials For Structure
The toy’s framework needs sturdy materials to keep it intact during play. Wood, cardboard, and plastic sheets are popular choices. Wood feels solid and lasts long, but cardboard is lightweight and easy to cut.
- Wood:Plywood or craft sticks for strong frames.
- Cardboard:Thick boxes or sheets that can be folded and glued.
- Plastic Sheets:Flexible and durable for water-resistant toys.
Decorative And Functional Add-ons
Small parts bring your toy to life and make it interactive. Buttons, beads, fabric scraps, and googly eyes add character and texture. Don’t forget safety—avoid small pieces if the toy is for young children.
- Buttons and Beads:Great for eyes, noses, or decorative accents.
- Fabric Scraps:Perfect for soft parts like clothes or wings.
- Googly Eyes:Make the toy fun and engaging.
Safety Gear And Tools
Your safety matters while building. Gloves and goggles protect your hands and eyes when cutting or gluing. Have a clean workspace and keep sharp tools away from children during assembly.
- Gloves:Protect your hands from cuts and glue.
- Goggles:Shield your eyes from debris.
- Clean Workspace:Keeps materials organized and prevents accidents.
What materials do you already have around your home that could be perfect for your next toy project? Sometimes the best creations come from the simplest supplies within reach.

Credit: ericjacobydesign.com
Choosing The Right Toy
Choosing the right toy is a crucial step in building one that truly delights and engages. It sets the foundation for a successful project and ensures the final product fits the needs and interests of the intended user. Picking the perfect toy means balancing fun, safety, and challenge to create a meaningful experience.
Age Appropriateness
Consider the age of the person who will use the toy carefully. Younger children need toys with larger parts to avoid choking hazards, while older kids can handle more complex pieces. Think about the interests typical for their age group—toddlers might enjoy bright colors and simple shapes, while preteens often prefer toys that let them build or solve problems.
Ask yourself: Will this toy keep their attention without causing frustration? A toy too advanced might discourage them, while one too simple could quickly bore them. Tailoring the toy’s design to the right age will make your effort much more rewarding.
Skill Level
Match the toy’s complexity to the skill level of the builder and the user. If you’re building the toy yourself, consider your own experience with tools and materials. Choose designs and assembly steps you feel confident completing well.
For the user, a toy that challenges their abilities just enough can boost confidence and encourage learning. If you aim too high, it might lead to frustration; too low, and the toy won’t hold their interest. Think about what skills the toy can help develop, like hand-eye coordination or problem-solving, and design accordingly.
Designing Your Toy
Designing your toy is an exciting part of the building process. It sets the foundation for how your toy will look and feel. A clear design helps you make better choices in materials and construction. The design phase also allows creativity to flow freely before any cutting or assembling begins.
Sketching Ideas
Start by drawing simple sketches of your toy. Use a pencil and paper to capture your thoughts quickly. Don’t worry about perfection. Focus on different shapes and forms. Try several versions to explore various looks. Sketching helps visualize the toy’s size and parts. It makes it easier to plan the next steps. You can also add notes about special features or movements.
Selecting Colors
Colors bring your toy to life and attract attention. Choose colors that match the toy’s purpose or theme. Bright colors work well for playful toys, while soft tones suit calming toys. Think about the materials you will use and how colors will appear on them. Keep the color palette simple to avoid clutter. A few well-chosen colors create a strong, clear design. Test color combinations on paper or digitally before finalizing.

Credit: www.youtube.com
Gathering Tools
Before you dive into building your toy, gathering the right tools is essential. Having everything ready not only speeds up your work but also improves the quality of your final product. Let’s look at what tools you need and how to keep yourself safe during the process.
Basic Tools
Start with a few must-have tools that fit most toy-building projects. A good set usually includes a hammer, screwdrivers (both flathead and Phillips), and pliers. These tools help you join parts, tighten screws, and handle small pieces with ease.
Don’t forget about a measuring tape or ruler. Precise measurements are crucial to ensure parts fit perfectly. A utility knife or small saw can help you cut materials like wood or plastic accurately.
- Hammer
- Flathead and Phillips screwdrivers
- Pliers
- Measuring tape or ruler
- Utility knife or small saw
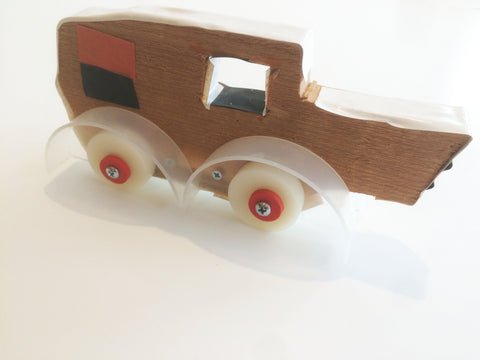
I once tried building a wooden toy car without a measuring tape and ended up with wheels that didn’t align properly. That taught me to never skip this simple tool.
Safety Equipment
Working with tools can be risky without the right safety gear. Protect your eyes with safety goggles, especially when cutting or hammering. Gloves will shield your hands from splinters, sharp edges, and accidental scrapes.
Consider a dust mask if you’re sanding or working with materials that create fine particles. Noise-canceling earplugs might be helpful if power tools come into play. Your safety gear is just as important as your tools to make sure your toy-building is fun and injury-free.
- Safety goggles
- Protective gloves
- Dust mask
- Earplugs (optional)
Have you ever thought about how much time and effort you could save by avoiding injuries? Taking a few moments to gear up properly can keep you focused and energized throughout your project.
Step-by-step Assembly
Assembling a toy can be a fun and rewarding experience, especially when you see your creation come to life. The process breaks down into clear stages that help keep things organized and manageable. Let’s dive into each part of the assembly to make sure your toy turns out just right.
Preparing Materials
Start by gathering all the materials you’ll need. This usually includes the main components like wood, plastic, or fabric, plus tools such as glue, scissors, and paint. Make sure everything is clean and ready to use before you begin.
Sorting your materials by type or size can save time later. You might want to lay them out on a table or use containers to keep small parts from getting lost. This simple step prevents frustration and helps you focus on building.
Building The Structure
Focus on creating a strong base first. This could mean assembling the frame of a wooden toy or snapping together plastic parts carefully. Precision here matters because a stable structure makes the rest of the build easier and more durable.
Take your time to check each joint or connection for tightness. Don’t rush this step—even a small loose piece can cause problems later. If you find parts don’t fit well, ask yourself how you can adjust them before moving forward.
Adding Details
Once the main structure is solid, it’s time to add personality through details. This could be painting, attaching stickers, or sewing on buttons. Details make your toy unique and can reflect your creativity.
Think about what will make the toy enjoyable to use or look at. Sometimes, small touches like a colorful pattern or a movable part can make all the difference. What details would make this toy special for you or someone you know?
Decorating The Toy
Decorating your toy is where creativity truly shines. This step lets you bring personality and charm to the piece you built. The right decoration can make your toy stand out, turning it into a unique treasure.
Painting Techniques
Painting gives your toy color and life. Start with a primer to help the paint stick better and last longer. Use acrylic paints; they dry quickly and come in vibrant colors.
Try these painting techniques to add depth and interest:
- Dry brushing:Lightly dip your brush in paint, then wipe most off. Brush over raised surfaces for a textured look.
- Sponging:Dab a sponge with paint and gently tap the toy’s surface for a mottled effect.
- Layering:Apply thin layers of paint, letting each dry before adding the next. This builds rich, complex colors.
Have you experimented with mixing colors directly on the toy? It can create unexpected and beautiful results.
Creative Add-ons
Adding small elements can transform your toy from simple to spectacular. Think beyond paint—consider materials like fabric, buttons, or googly eyes.
Here are some ideas to boost your toy’s personality:
- Attach felt or cloth to create clothing or accessories.
- Use small beads or sequins for sparkling details.
- Add ribbons or yarn for hair or tails.
- Glue on tiny props like miniature hats or glasses.
What unique feature could you add that reflects your own style? Sometimes the smallest detail makes the biggest difference.
Testing For Safety
Testing for safety is a crucial part of building any toy. It ensures that the toy won’t harm the child using it, giving you peace of mind and trust from parents. You need to be thorough and intentional with every test you perform.
Durability Checks
Durability checks make sure your toy can handle rough play without breaking or causing injury. Try pressing, bending, and dropping the toy multiple times to see if any parts snap or come loose. Think about how a child might use the toy—will it survive a fall from a table or the backyard?
Look closely for sharp edges or small pieces that could break off. If a part does come loose, could it become a choking hazard? Testing these scenarios helps you catch problems early.
Safety Standards
Meeting safety standards is more than a suggestion; it’s often the law. These standards cover things like toxic materials, choking hazards, and flammability. Do you know which safety certifications apply to your toy type and target age group?
Use reliable resources to check the standards from organizations like ASTM, CPSIA, or EN71. Keeping a checklist helps you stay organized and ensures you don’t miss critical safety rules. Testing your materials and final product against these standards protects both children and your reputation.

Credit: ericjacobydesign.com
Tips For Enhancing Creativity
Boosting creativity while building a toy can turn a simple project into a memorable experience. It challenges you to think beyond the usual shapes and functions, pushing your imagination to new limits. Here are some tips to help you add flair and originality to your toy-making journey.
Incorporating New Elements
Try adding unexpected materials or features to your toy. This could mean using recycled items like bottle caps or fabric scraps to give your creation a unique texture or look.
Don’t hesitate to mix different styles or functions. For instance, combining a puzzle with a movable figure can make the toy more engaging and interactive.
Ask yourself: What small detail can make my toy stand out? Sometimes, a simple change like adding a button that makes sound can spark more interest and play value.
Involving Kids In The Process
Let children share their ideas and help with simple tasks during toy building. Their fresh perspective often leads to surprising and fun design twists you might not have thought of.
Encourage kids to customize the toy with colors, stickers, or drawings. This personal touch makes the toy more special and encourages their creativity.
Think about how you can turn the building process into a shared adventure. When kids feel ownership, they’re more excited about the final product and eager to play.
Frequently Asked Questions
What Materials Do I Need To Build A Toy?
You need basic materials like wood, plastic, fabric, or cardboard. Choose safe, non-toxic items for children’s use. Tools like glue, scissors, and paint are also essential for assembling and decorating your toy.
How Long Does It Take To Build A Toy?
Building a toy typically takes between 1 to 3 hours. The time depends on complexity, materials, and your experience. Simple toys can be made quickly, while detailed designs require more time and patience.
Can I Build A Toy Without Special Tools?
Yes, you can build simple toys using household tools. Scissors, glue, tape, and markers often suffice. For complex toys, specialized tools help but are not always necessary for basic projects.
How Do I Ensure My Toy Is Safe For Kids?
Always use non-toxic, child-safe materials. Avoid small parts that pose choking hazards. Smooth edges and sturdy construction prevent injuries. Test your toy thoroughly before giving it to children.
Conclusion
Building a toy can be fun and rewarding. Start with a clear plan and simple materials. Take your time and enjoy each step. Testing the toy helps find and fix mistakes. Sharing your creation brings joy to others. Keep practicing to improve your skills.
Every toy you build teaches something new. Creativity and patience lead to great results. Try new ideas and have fun along the way. Making toys is a great way to learn and play.