In this guide
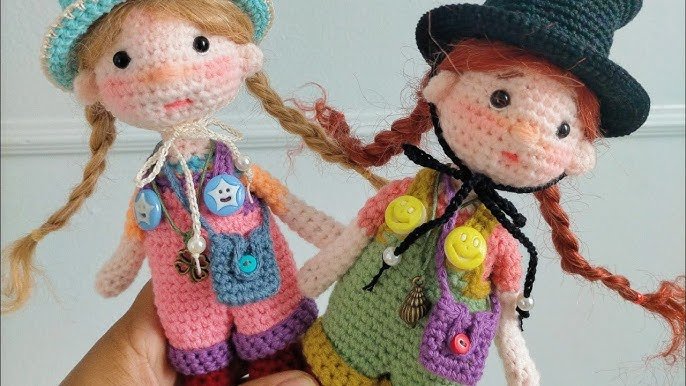
Have you ever wanted to create something truly special with your own hands? Learning how to crochet dolls lets you turn simple yarn into charming, personalized toys that bring joy to kids and adults alike.
Imagine making a doll that’s unique—crafted exactly the way you want, with colors and details that reflect your style. In this guide, you’ll discover easy steps and helpful tips to start crocheting dolls today, even if you’re a complete beginner.
Ready to unlock your creativity and make something unforgettable? Let’s dive in!

Credit: www.youtube.com
Choosing Materials
Choosing the right materials sets the foundation for your crochet doll project. The yarn and hook you pick can change how your doll looks and feels. Paying attention to these details helps you create a doll that you’ll love and be proud of.
Selecting Yarn
Your yarn choice affects the doll’s texture, durability, and color richness. Soft acrylic yarns are beginner-friendly and easy to care for, making them a great start. Cotton yarn offers a smooth finish but can feel stiffer and may split more easily while you crochet.
Think about the doll’s purpose. Is it a toy for a child or a decorative piece? For toys, choose yarn that’s washable and safe for kids. For display dolls, you might prioritize vibrant colors or unique textures.
Have you noticed how some yarns change your tension or stitch definition? Trying different brands can help you find the one that feels just right in your hands.
Picking Crochet Hook
The crochet hook size should match your yarn weight to keep your stitches neat and consistent. Using a hook that’s too large can leave loose stitches, while a smaller hook makes the fabric tight and harder to work with.
Hooks come in various materials like aluminum, plastic, and wood. Aluminum hooks slide smoothly, which helps speed up your work, while wooden hooks offer more grip and warmth to your hands.
Try a few hooks to see which feels comfortable during long sessions. Your hand comfort directly impacts your enjoyment and the quality of your doll.
Basic Crochet Stitches
Basic crochet stitches form the foundation for making beautiful crochet dolls. Learning these stitches helps you create shapes and textures easily. Each stitch builds on the previous one to form the doll’s body, clothes, and details.
Start practicing these simple stitches to gain confidence. They are easy to learn and fun to work with. With patience, your crochet dolls will come to life.
Chain Stitch
The chain stitch is the starting point for almost every crochet project. It creates a base row to work other stitches into. To make a chain stitch:
- Make a slip knot on your hook.
- Yarn over and pull through the loop on the hook.
- Repeat for the number of chains needed.
Chains control the length of your project. For dolls, chains shape limbs and body parts.
Single Crochet
Single crochet is a tight stitch that makes a firm fabric. It works well for stuffing areas like doll heads and arms. To do a single crochet:
- Insert the hook into the stitch.
- Yarn over and pull up a loop.
- Yarn over again and pull through both loops on the hook.
This stitch creates a dense texture, perfect for small details.
Double Crochet
Double crochet is taller and looser than single crochet. It adds height and softness to your doll parts. The steps are:
- Yarn over first.
- Insert the hook into the stitch.
- Yarn over and pull up a loop.
- Yarn over and pull through two loops.
- Yarn over and pull through the last two loops.
This stitch works well for doll clothes and accessories. It creates a flexible fabric with visible holes for decoration.
Creating Doll Patterns
Creating doll patterns is a crucial part of crocheting dolls that lets you bring unique characters to life. It requires understanding the structure of patterns and knowing how to tweak designs to fit your vision. Once you grasp these skills, you can craft dolls that truly reflect your style and creativity.
Understanding Patterns
Patterns are like blueprints for your doll. They provide step-by-step instructions on stitches, shapes, and assembly. Learning to read them means you can follow along without confusion.
Most doll patterns include:
- Materials needed (yarn type, hook size)
- Abbreviations and stitch guides
- Row-by-row instructions
- Assembly tips
Focus on recognizing common stitch terms and symbols. This helps you avoid mistakes and speeds up your work. Have you tried marking your progress with a row counter or notes? It can make a big difference.
Customizing Designs
Once you’re comfortable with patterns, start customizing. Change colors, sizes, or add accessories to make your doll stand out. Small tweaks can turn a basic doll into something special.
Think about:
- Altering the hair style with different yarn textures
- Adjusting the size by increasing or decreasing stitches
- Adding details like buttons, embroidery, or clothing
Don’t hesitate to experiment. Sometimes changing just one element, like eye shape or outfit style, can give your doll a new personality. What unique feature will your next doll have?

Credit: lefthandedcrocheter.com
Crocheting The Body
Crocheting the body of a doll is where your creation starts to take shape and personality. This stage requires attention to detail and a steady hand, but the results are incredibly rewarding. With each stitch, you are building the foundation that will support the doll’s charm and character.
Starting The Head
Begin by creating a tight, rounded head using simple crochet stitches. I like to use single crochet stitches worked in continuous rounds to keep the shape smooth and seamless.
Make sure to increase evenly as you go, so the head forms a perfect sphere. Too many increases in one spot can create lumps, which you want to avoid. Think about how you want the doll’s face to look—adding or subtracting a few stitches can help shape the forehead and cheeks.
Forming The Torso
The torso connects directly to the head and should be slightly narrower at the top, widening toward the bottom for a natural look. Use a combination of increases and decreases to contour this area.
Pay attention to the length as well. A torso that’s too short can make the doll look squat, while too long might appear awkward. Feel free to stop and compare your work to a doll or figure you admire to get the proportions right.
Shaping Arms And Legs
Arms and legs are usually crocheted separately and then sewn onto the torso. I find working in spirals with consistent stitch tension helps keep the limbs smooth and even.
Consider the thickness and length carefully. Too thick, and the doll looks bulky; too thin, and the limbs might lack structure. Adding a few stuffing pieces inside the limbs as you go can help maintain their shape and make the doll more durable.
Adding Facial Features
Adding facial features is a key step in making your crochet doll come alive. Faces give personality and charm. Small details like eyes, mouth, and nose make the doll unique. These features can be simple or detailed. There are different ways to add them depending on your skill and style. Choose the method that fits your project best.
Embroidery Techniques
Embroidery is a popular way to create facial features on crochet dolls. Use a needle and embroidery thread or yarn in your chosen colors. Common stitches include satin stitch for the mouth and backstitch for eyebrows or eyelashes.
- Start by marking the face lightly with a washable pen.
- Use small, neat stitches for a clean look.
- Layer stitches to add depth and expression.
- Try different thread colors for shading effects.
Embroidery allows full control over expression and detail. It keeps the face flat and soft, perfect for baby-safe dolls.
Attaching Safety Eyes
Safety eyes are plastic eyes with a locking back. They give a polished and realistic look. These eyes come in many sizes and colors to match your doll’s style.
- Insert eyes through the crochet stitches on the head.
- Secure the locking washer tightly behind the fabric.
- Place eyes evenly spaced for balanced appearance.
- Check they are firmly attached to avoid hazards.
Safety eyes are fast to install and very durable. They are ideal for dolls meant for older children or decoration.

Credit: www.instagram.com
Designing Clothing
Designing clothing for your crochet dolls lets you add personality and style to each creation. It’s a fun way to experiment with colors, textures, and shapes that bring your doll to life. Think about what your doll’s personality might be and how clothing can express that.
Keep your designs simple at first. Complex patterns can wait until you get more comfortable with shaping and sizing. Don’t be afraid to customize as you go—sometimes the best outfits come from small tweaks and happy accidents.
Simple Dress Patterns
Start with basic shapes like A-line or tube dresses that fit snugly around the doll’s body. These are easier to adjust and don’t require intricate stitching. Use single or double crochet stitches to keep the fabric dense but flexible.
Try a pattern with these elements:
- A chain foundation that matches the doll’s waist circumference.
- Rows of single crochet to build the skirt length.
- A few increases near the bottom for flare.
Adding a simple edging like a scalloped or picot border can instantly make the dress look more polished. Have you noticed how small details can change the whole vibe of your doll’s outfit? Experiment with yarn thickness and color to find what feels right.
Crocheting Accessories
Accessories give your doll a unique charm and complete the outfit. Think hats, scarves, shoes, or tiny bags. They don’t need to be complicated; a basic beanie or a mini tote can add lots of character.
Here are some quick ideas you can try:
- Hats:Work in rounds with single crochet and add a small pom-pom or flower.
- Scarves:Use a simple chain and rows of half double crochet for a cozy look.
- Shoes:Make small ovals for soles and build up with slip stitches.
Think about how these accessories can tell a story about your doll. Is she ready for a winter stroll or a sunny day out? Adding accessories encourages you to think about the character’s lifestyle and mood, making your crochet process even more rewarding.
Finishing Touches
Finishing touches bring your crochet doll to life. This stage makes your doll soft, sturdy, and ready for play. Attention to detail here improves the look and feel of your creation. Take your time to ensure every part fits perfectly. Small efforts yield beautiful results.
Stuffing The Doll
Choose soft, clean stuffing material. Polyester fiberfill works well for most dolls. Avoid using too much stuffing; this can stretch the stitches. Add stuffing gradually. Fill the doll evenly to keep shape smooth. Use a pencil or chopstick to push stuffing into small areas. Pay attention to the head and limbs to avoid lumps.
Assembling Parts
Lay out all pieces before sewing. Use matching yarn and a yarn needle for assembly. Sew parts firmly but gently to avoid holes. Attach arms and legs securely to support movement. Use small, tight stitches for a neat finish. Check that all parts are even and aligned. Secure yarn ends inside the doll to hide them. This prevents unraveling and keeps the doll looking tidy.
Tips For Beginners
Starting to crochet dolls can feel overwhelming, but with the right approach, you can turn those initial challenges into rewarding progress. Focus on mastering the basics and building confidence gradually. Small, consistent efforts will help you improve quickly and enjoy the process.
Common Mistakes
Many beginners struggle with tension control. If your stitches are too tight, the doll will be stiff; too loose, and it may fall apart. Try to keep your yarn tension consistent, practicing with scrap yarn before working on your doll.
Another frequent mistake is skipping stitch counts. This can throw off the shape of your doll. Use stitch markers or write down your counts to keep track accurately.
Don’t rush through the pattern. I once hurried and missed a crucial step, which meant undoing hours of work. Take your time and read each step carefully before moving on.
Helpful Resources
- Video Tutorials:Watching someone crochet a doll can clarify tricky techniques. Channels like “HappyBerry Crochet” offer beginner-friendly doll patterns.
- Pattern Websites:Websites like Ravelry and Etsy provide thousands of patterns with detailed instructions and user reviews. Choose patterns labeled “beginner” to start.
- Online Communities:Joining crochet forums or Facebook groups can connect you with experienced crocheters ready to offer advice and support.
- Books:Books such as “Amigurumi World” provide step-by-step instructions and helpful photos that you can refer to anytime.
What’s the biggest challenge you’ve faced while crocheting your first doll? Sharing your experiences can help others avoid the same pitfalls and grow your skills faster.
Frequently Asked Questions
What Materials Are Needed To Crochet Dolls?
To crochet dolls, you need yarn, a crochet hook, stuffing, scissors, and a yarn needle. Use soft, durable yarn for best results. Choose appropriate hook size based on yarn thickness. Optional materials include safety eyes and embroidery thread for facial features.
How Long Does It Take To Crochet A Doll?
Crocheting a doll typically takes 4 to 10 hours. Time varies by doll size, complexity, and your skill level. Beginners may take longer, while experienced crocheters work faster. Planning and following a clear pattern help speed up the process.
Can Beginners Crochet Dolls Easily?
Yes, beginners can crochet dolls with simple patterns. Start with basic shapes like spheres and cylinders. Use easy stitches such as single crochet. Practice tension and shaping skills before advancing to detailed designs. Patience and practice improve results.
How Do I Stuff A Crochet Doll Properly?
Stuff the doll firmly but not too tight for shape retention. Use polyester fiberfill or cotton stuffing. Insert stuffing evenly in small amounts. Pay attention to limbs and head for smooth, balanced form. Avoid lumps by adjusting stuffing as you go.
Conclusion
Crocheting dolls is a fun and creative hobby anyone can try. Start with simple patterns to build your skills. Choose soft yarn and safe stuffing for a nice finish. Take your time and enjoy each stitch you make. Practice helps you improve and create unique dolls.
Share your work with friends or family for joy. Keep experimenting with colors and shapes. Soon, you will have a collection of handmade dolls. This craft brings satisfaction and endless fun. Give it a go and see where your creativity leads!